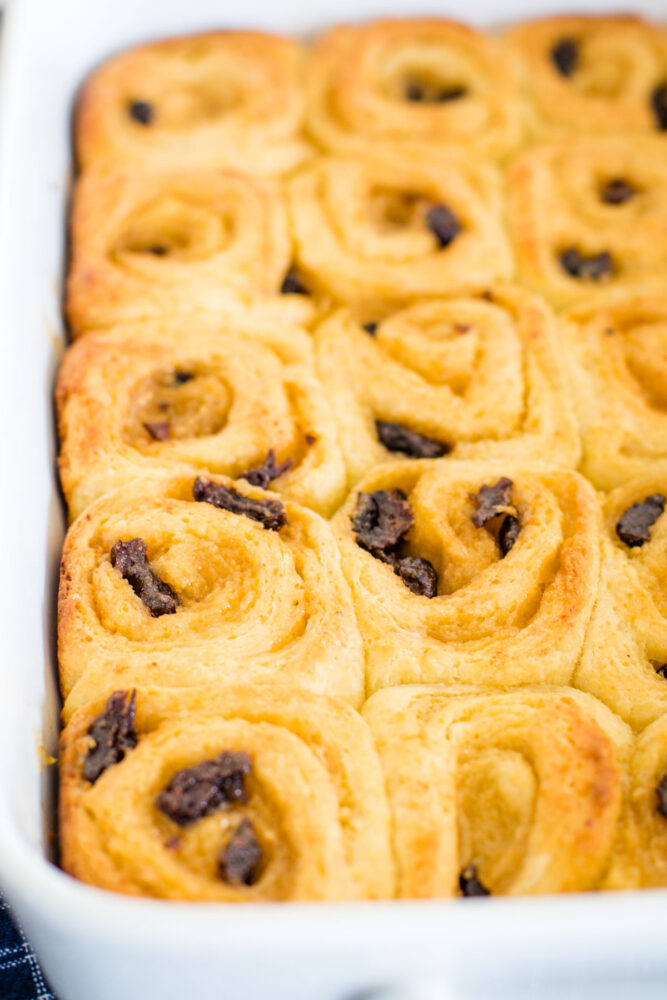
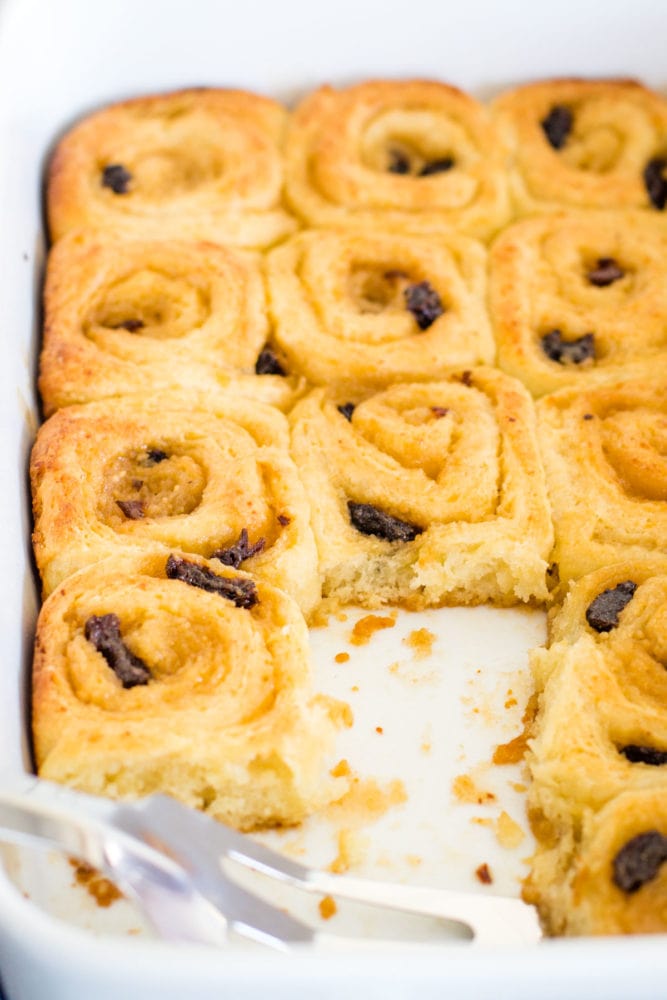
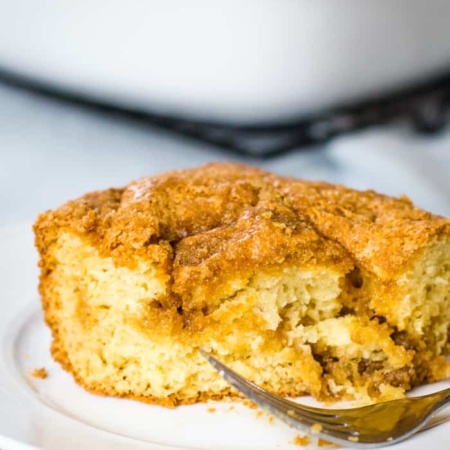
This Danish roll recipe will give you the most buttery, flaky pastry rolled with sweet raisins in a sugary filling! This recipe is from a vintage recipe which is a classic variation of what you might envision. It creates the most delicious pastry roll (think cinnamon roll style) that goes beautifully with a hot cup of coffee.
This vintage Danish roll recipe features a classic Danish pastry that’s not only simple but incredibly easy to make from scratch. Honestly, I had never had a classic Danish pastry before this one. I used to think of them as pastries topped with cream cheese and a swirl of fruit, but this recipe captures old-fashioned flavors and textures.
It’s perfect for any time of the day, and fancy enough to even serve during the holidays! The rich buttery flavors and flaky texture are irresistible, and making homemade Danish dough is easier than you think! It’s simplicity at its best.
Table of Contents
Why I Love This Recipe
Quick: Although the dough needs time to rise, the actual hands-on time is quite minimal. The total time from start to finish is just a few hours, making this recipe perfect for a weekend breakfast or brunch.
Delicious: The combination of the buttery pastry dough, sweet filling, and a hint of vanilla extract creates a mouthwatering flavor that is hard to resist. These rolls bake up golden brown and are best served warm straight from the oven.
Versatile: This Danish roll recipe is versatile. Feel free to experiment with different fillings like jam or cream cheese, or even sprinkle some pecans on top for an added crunch.
Crowd-pleaser: Whether you’re hosting a breakfast gathering or need a special treat for a holiday morning, these Danish rolls are a surefire crowd-pleaser. They’re not only delicious but also look impressive on the breakfast table.

Want to save this recipe?
Enter your email & I'll send it to your inbox. Plus, get great new recipes from me every week!
Key Ingredients
Yeast: This is the magic ingredient that will make your dough rise, giving your Danish rolls that light and fluffy texture. Remember, the yeast mixture needs a warm environment to activate, so find a cozy spot in your kitchen for it to do its thing.
Water: The warm water is used to activate the yeast. Make sure it is not too hot or it could kill the yeast.
All-purpose flour: This gives your pastries structure. It creates the basic dough that will eventually become your delicious Danish rolls.
Granulated sugar: It will not only sweeten your dough, but also feed the yeast to help it grow.
Salt: A little bit of salt enhances the flavor of the other ingredients and balances the sweetness.
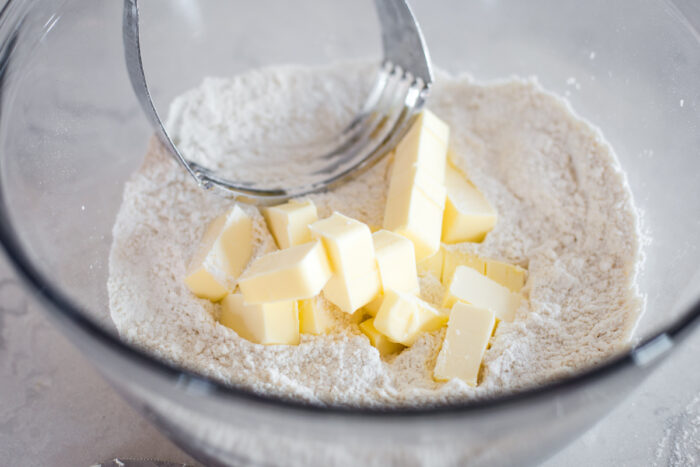
Butter: The cold butter in this recipe is crucial for creating flaky layers in your Danish rolls. As it melts during baking, it creates pockets of air, which give your pastries their deliciously light texture.
Cottage cheese: This is creamed to create a smooth, rich filling for the rolls. Don’t worry if there’s a bit of texture left, those little bits will create beautiful air pockets making the rolls flaky.
Egg: An egg is beaten into the dough to help bind the ingredients together and provide moisture. Remember, it’s best if your egg is at room temperature.
Light brown sugar: This type of sugar gives your rolls a deeper, caramel-like sweetness and a lovely golden brown color.
Vanilla extract: A dash of vanilla extract adds a hint of warm, sweet flavor that compliments the buttery dough and sweet filling perfectly.
Melted butter: This is brushed over the top of the rolls before baking to give them a beautiful golden brown color and a deliciously buttery flavor.
Raisins or nuts: These are optional, but they add a wonderful texture and flavor to your Danish rolls. Whether you prefer the sweet chewiness of raisins or the crunchy bite of nuts, they make a great addition to this recipe.
Equipment
Large Bowl – You’ll need this to combine the flour, white sugar, and salt. This is also where you’ll cut in the cold butter and add the creamed cottage cheese, egg, and yeast to make your dough.
Rolling Pin – This is essential for rolling out your Danish pastry dough to the required rectangle size.
Small Bowl – You’ll use this to mix together the brown sugar, melted butter, and vanilla extract. This mixture will then be spread over your rolled-out dough.
Sharp Knife – This will help you cut your rolled dough into half-inch slices. A sharp knife guarantees clean cuts without squishing your dough.
Baking pan – We’ll place the pastries in it to rise and then bake them in the oven. Make sure to grease it well to prevent your pastries from sticking.
How to Make Danish Roll
Preparation
Firstly, make sure that all your ingredients are ready and at room temperature (except for the cold butter) and gather all the necessary equipment. Next, activate the yeast in warm water until it starts to foam.
Step 1 – Prepare the Dough
In a large bowl, combine your flour, white sugar, and salt. Give it a quick stir to achieve a uniform mixture. Next, cut in your cold butter, making sure that it is well incorporated into the mixture. Add your creamed cottage cheese, egg, and the dissolved yeast mixture. Mix these ingredients thoroughly until they form a smooth dough.
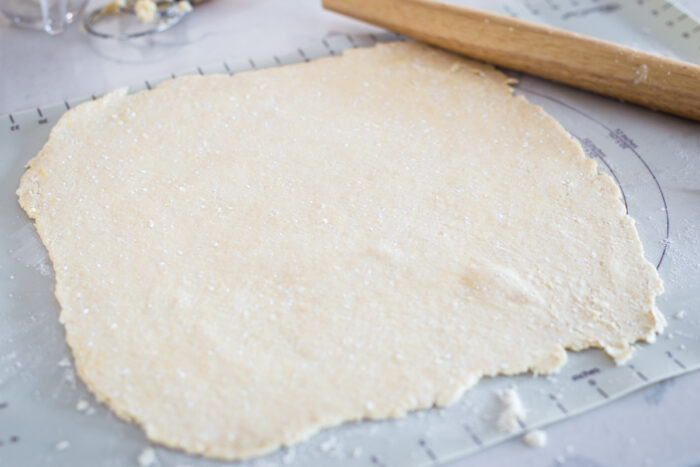
Step 2 – Roll Out the Dough
Once your dough is ready, it’s time to roll it out. You should aim for a rectangle shape approximately 14×14 inches wide. This will give you enough surface area to add your filling and roll up your pastries.
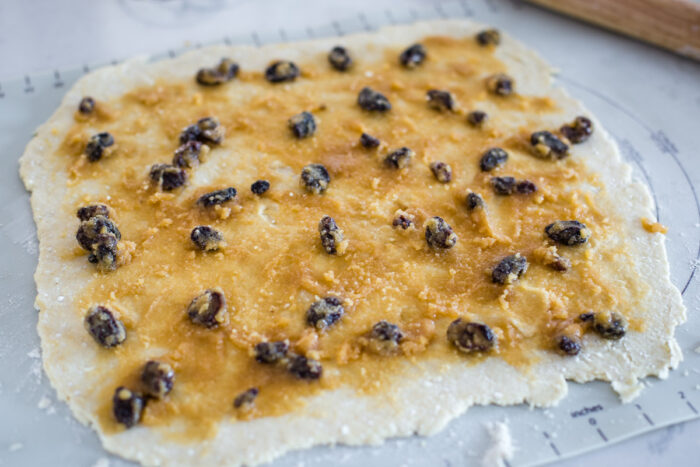
Step 3 – Prepare and apply the Filling
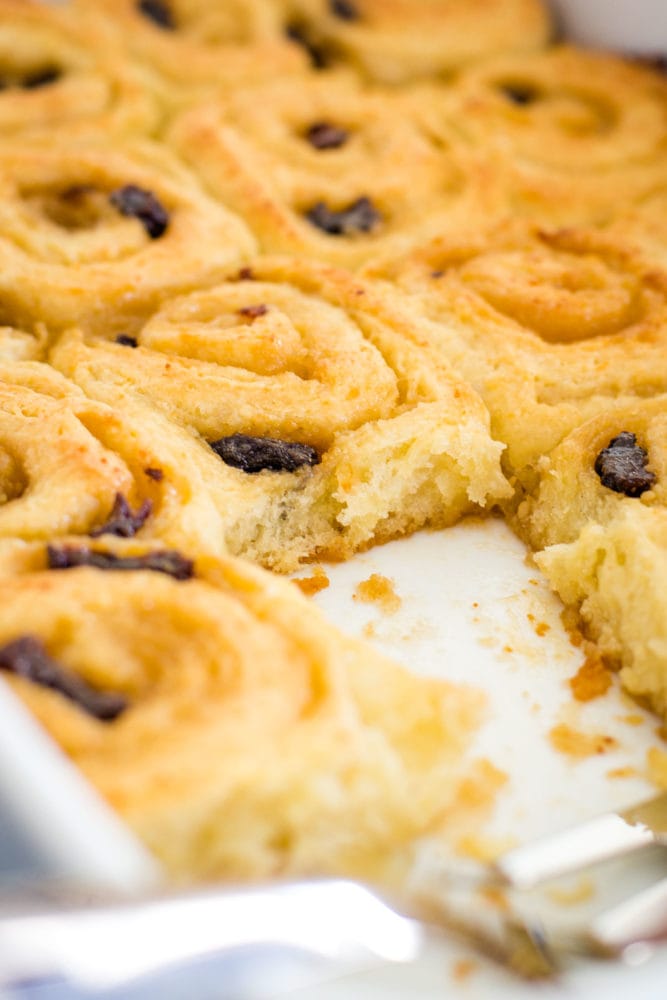
In a separate, smaller bowl, combine your brown sugar, melted butter, and vanilla extract. Stir this mixture until it becomes a smooth and spreadable paste. Spread this filling evenly over your rolled-out dough, and then sprinkle your choice of nuts or raisins on top.
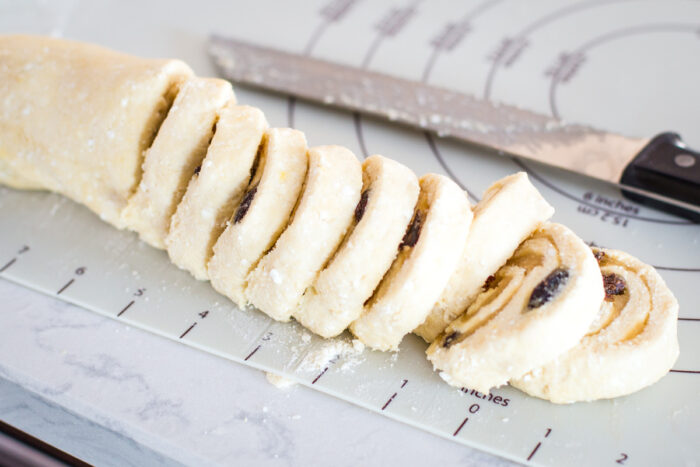
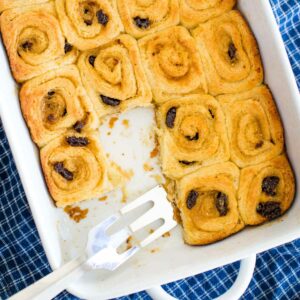
Step 4 – Roll and cut the Pastries
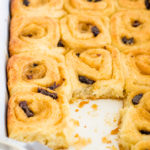
Now, carefully roll up your dough, making sure to keep the filling inside. Once fully rolled, cut the dough into slices, each about a half-inch thick. Place these slices on a greased baking sheet and let them rise for about two hours, or until they’ve doubled in size.
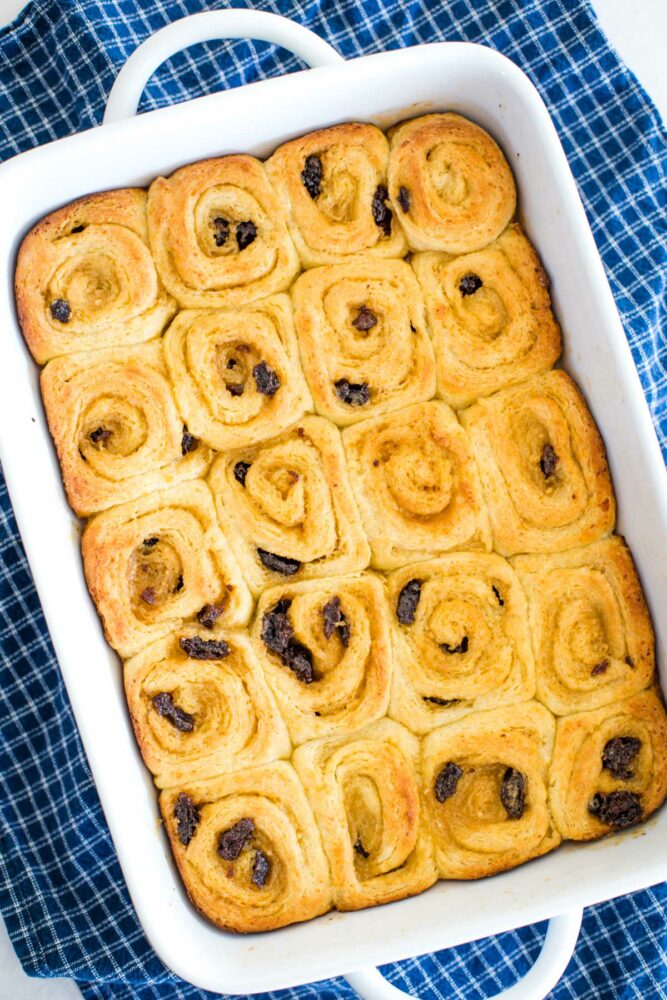
Step 5 – Bake the Pastries
Once your pastries have risen, it’s finally time to bake! Place your baking sheet in your preheated oven at 400 F and bake for about 15-20 minutes. Keep an eye on them, and once they’ve turned a beautiful golden brown, remove them from the oven. Let them cool a bit, and then they’re ready to enjoy!
Expert Tips
Find a warm spot for dough rising: Allow the dough to rise in a warm, draftless area if possible. This helps the yeast in the dough work effectively and results in a fluffier pastry.
Cream the cottage cheese: Use a mixer to cream your cottage cheese, which while may still leave some texture, will aid in creating the air pockets that make the rolls flaky.
Use cold butter: Incorporating cold butter into your recipe not only aids in the cut-in process but also creates pockets of flakiness as it melts while baking in the oven.
Roll the dough evenly: When rolling out your Danish pastry dough, aim for a consistent thickness. An even dough will bake more uniformly, guaranteeing that every bite is perfect.
Grease your baking pan: Prior to placing your cut Danish rolls on the baking sheet, make sure it is greased well. This prevents the pastries from sticking and makes removal after baking easier.
Recipe Variations
Try it with cream cheese filling: If you’re a fan of cream cheese, you can add a delicious twist to your Danish roll. Simply replace the cottage cheese with a cream cheese filling for a richer, creamier taste. The cream cheese will melt during baking, creating a deliciously rich center.
Give it a nutty twist: For a crunchier texture and a nutty flavor, add some pecans to your Danish roll. Mix chopped pecans into the brown sugar and butter mixture before spreading it over the dough. The toasted pecans will add an extra layer of flavor and a tasty crunch to every bite.
Make it fruity: If you love a sweet and tangy combo, try adding a layer of your favorite jam or preserves before rolling up the dough. This will infuse your breakfast pastries with a fruity flavor, making it a perfect companion for your breakfast tea or coffee.
Add some chocolate: For the chocolate lovers, you can add some chocolate chips along with the raisins or nuts. The chocolate will melt during baking, creating a sweet filling that compliments the buttery pastry perfectly.
What to Serve With
- A delicious way to savor these Danish rolls is by serving them warm for breakfast. Spread a generous dollop of your favorite jam on top to enhance the sweet and buttery flavor.
- These Danish rolls make a great accompaniment to your afternoon tea. The light, flaky pastries pair wonderfully with a bold cup of Earl Grey or a soothing chamomile tea.
- Turn these Danish rolls into a delicious dessert by serving them with a scoop of vanilla ice cream. The cold, creamy ice cream complements the warm, buttery rolls, creating a dessert that’s sure to impress.
- For a festive twist, serve these Danish rolls during the holidays with a sprinkle of powdered sugar on top. The white sugar gives the pastries a snow-kissed look, perfect for a cozy winter breakfast.
Recipe FAQs
You can use either active dry yeast or instant yeast for this Danish roll recipe. If you’re using a package, it is usually about two and a quarter teaspoons. Just make sure to dissolve it in warm water as instructed.
Yes, letting the dough rise in a warm, draftless area will help to activate the yeast and let the dough expand. If your house is on the cooler side, it might take a bit longer for the dough to rise, up to three hours.
You can use a mixer to cream the cottage cheese. If there’s still some texture left after mixing, don’t worry. These little bits will help create the air pockets that make the rolls flaky.
Using cold butter in this recipe helps in two ways. First, it makes the process of cutting the butter into the flour easier. Second, as the cold butter melts in the oven, it creates little pockets of steam that make the rolls flaky.
Yes, the raisins or nuts in this recipe are optional. You can substitute them with other dried fruits or nuts of your choice, or leave them out entirely if you prefer.
Storing and Reheating
Refrigerate: After they’ve cooled down, you can store these rolls in the refrigerator. Keep them in an airtight container to maintain their flavor and texture. They can last for up to three days.
Reheat Instructions: When you’re ready to enjoy them again, reheat the pastries in the oven at a low temperature until they’re warm. This will help them regain their flaky texture and delicious taste.
Freeze: Unfortunately, these Danish rolls don’t freeze well once they’re cooked. The cream cheese filling tends to separate and the pastry becomes soggy when thawed.
More Breakfast Recipes You’ll Enjoy
Serving Size
What to Expect: This recipe makes twenty Danish rolls that you can easily store in the fridge for up to three days.
How to Scale: If you want to make more than twenty rolls, you can double the recipe and follow the instructions as directed. Make sure your bowl is large enough to mix the dough.
Danish Pastry Rolls
Ingredients
- 1 package yeast or 2 1/4 teaspoon
- 1/4 Cup water warm – 100-110˚ F
- 2 1/2 Cups all-purpose flour
- 1/4 Cup granulated sugar
- 1 teaspoon salt
- 1/2 Cup butter cold
- 1 Cup cottage cheese beat until smooth
- 1 egg beaten
- 3/4 Cup light brown sugar packed
- 1 teaspoon vanilla extract
- 3 Tablespoons butter melted
- 2/3 Cup raisins or nuts optional
Instructions
- Dissolve yeast in warm water. In a separate bowl, beat on high speed the cottage cheese until smooth.
- In a large bowl, combine the flour, white sugar, and salt. Stir. Cut in cold butter. Add creamed cottage cheese, egg, and yeast. Mix well into a dough.
- Roll the dough until it measures 14×14 inches.
- In a small bowl, combine brown sugar, melted butter, and vanilla. Spread over dough and top with nuts or raisins.
- Roll and cut into 1/2 inch slices. Place in greased 9×13 pan and let rise for 2 hours or until doubled in size.
- Bake in a preheated 400˚ F oven for 15-20 minutes.


Leave A Reply!