If you’ve ever thought of refinishing an heirloom, stop right there and think no further. Learning how to strip and refinish furniture can be intimidating. Below you’ll find my step by step instructions on how you can refinish furniture to it’s original beauty. Transforming a historical piece of furniture into a preserved beauty could not be easier with today’s woodworking tools, penetrating stains and choice of varnishes. So what keeps people from refinishing down to the bare wood?
Well, it’s time, my friends. It’s always going to be easier and quicker to rough sand a piece and apply a fresh coat of paint over top. But if you really want to restore a piece back to its original form with all the character of its natural beauty shining through, you’ll need a few more supplies, some elbow grease and a little (okay, a lot of!) patience. Trust me, the end result will be rewarding!
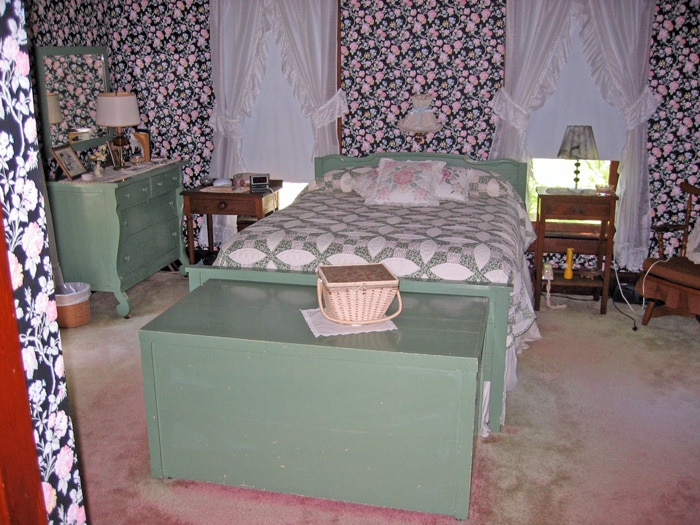
Lynette has posted this BEFORE picture of her master bedroom a couple of times during her farmhouse renovation. When we went through the house as a family before renovation, I chose grandma’s head and footboard to pass down to our children. My two daughters share a full size bed and we’d been looking for something like this for a long time. Though special to have my grandparents bed, I was a bit wary of that 1970’s mint green – eek! Had I ever fully refinished a piece of furniture before? Nope, but I was ready for the challenge. It’s not every day you come across beautiful woodworking like this with solid carving and detail. So over the next week, I stripped, sanded, stained and varnished my grandparent’s headboard in a labor of love. I transformed it back to its original beauty for the next generation to enjoy…and I could not be more thrilled!
Come on in to my garage!
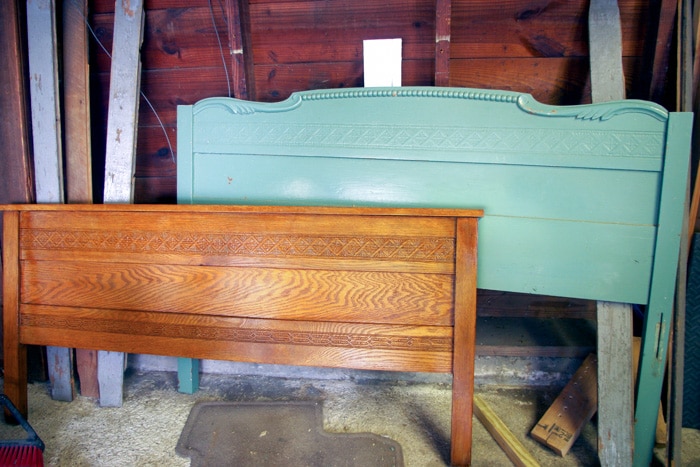
Before we begin with the step-by-step, I want to show you the transforming power of a fully refinished piece. I completed the footboard first and then stood it next to the untouched headboard. It doesn’t even look like they belong together! We don’t know how old this set is, but one thing is for sure – the refinished footboard looks much more original.
Step 1: Strip Off the Old Paint or Coating!

As I said in the beginning of this post, transforming a piece could not be more simple with the technology of today’s stripping gels. My favorite is called Citristrip and you can find it at most any home store. Get yourself a brush, a pair of gloves and a couple of scrapers. I used a 2 inch stiff scraper and a 2 inch soft grip scraper with a knob.
Brush on a generous amount of Citristrip and within seconds you will start to see the old paint bubble up. Allow the gel to set for at least 30 minutes before you try to remove it with a scraper. For stubborn paint, you can let the gel sit overnight.
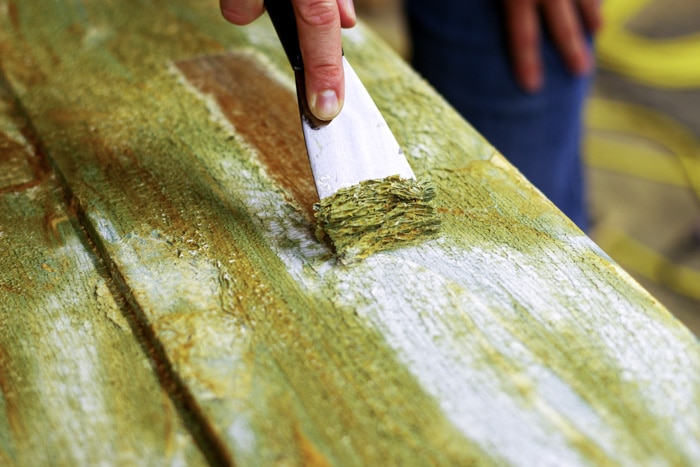
Here I am scraping off three layers of paint. It came off quite easy! I found that Citristrip worked best on layers of latex paint, but it can be reapplied for subsequent layers of stubborn oil based paint. Brush on… wait… scrape….repeat. Keep going until you get down to the bare wood and discard your strippings as you go.
Even after all that scraping, there is still going to be some paint residue left on the wood – especially if oil based paint was involved. The soft grip scraper with a knob comes in handy here! With one hand on the knob and one hand on the handle, you can apply greater pressure to the wood and scrape off the last of the residue for a clean bare wood finish.
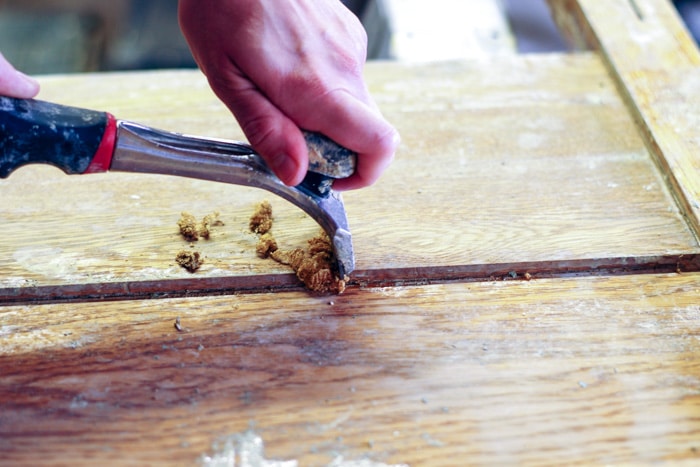
Step 2: Remove Paint from Detail Work

Many pieces of furniture have solid carvings or intricate detail work in the wood. Old paint gets lodged into the crevasses and will not come out with any amount of scraping.
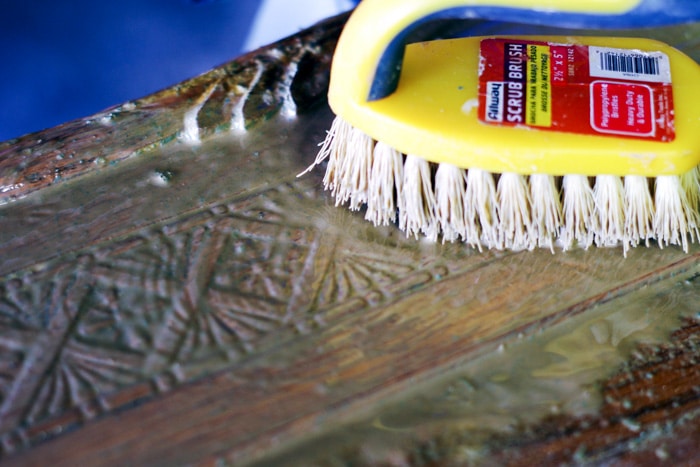
The best way to tackle this is more Citristrip and a heavy duty scrub brush! There is no need to hand pick out the paint – that would take way too long. Let the stripping gel do the hard work for you. Apply the Citristrip generously onto the detail work and scrub, scrub, scrub. The old paint mixing with the gel will become quite goopy, but trust me, it will work!

Wipe it all away with a old rag or t-shirt and repeat the process if needed. I only had to do it twice! You could also use a bit of mineral spirits to pick up some of the paint as well by mixing it in with the Citristrip before scrubbing.
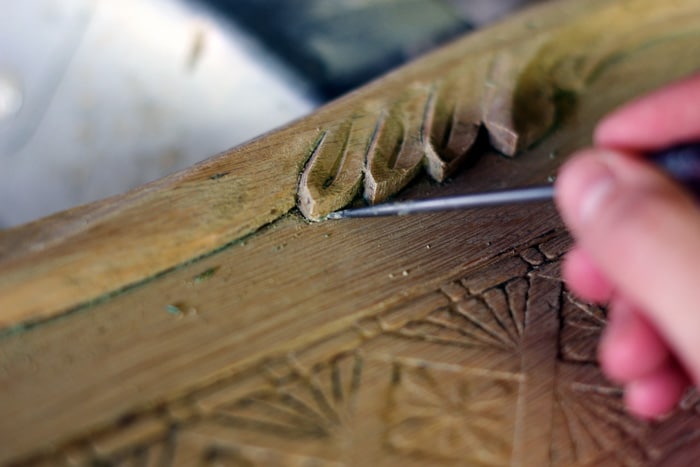
Of course, there may be a few areas of detail work in your piece that just have to be removed by hand, but I promise you after our scrubbing that it won’t be much. To get underneath these carved leaves, for example, I am using an awl to chip away any last remnants. Wipe the wood clean with a cloth.
Step 3: Sand Your Wood
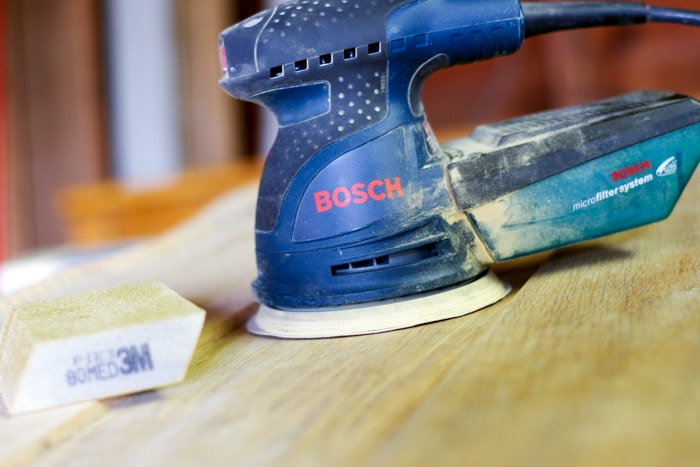
Before staining, we need an even surface on our wood. Sanding will do this and open the pores of our wood for a ready acceptance of stain. All of the sanding can be done by hand with a sanding block, but it’s even easier if you have an electric orbital sander. This is something I would invest in if you think you’ll be refinishing more pieces. With an 80 grit sanding disc, I sanded the entire piece thoroughly with the orbital sander and used the sanding block to get into the edges. When finished, wipe off any dust particles left on the wood with a cloth.
Step 4: Stain and Varnish
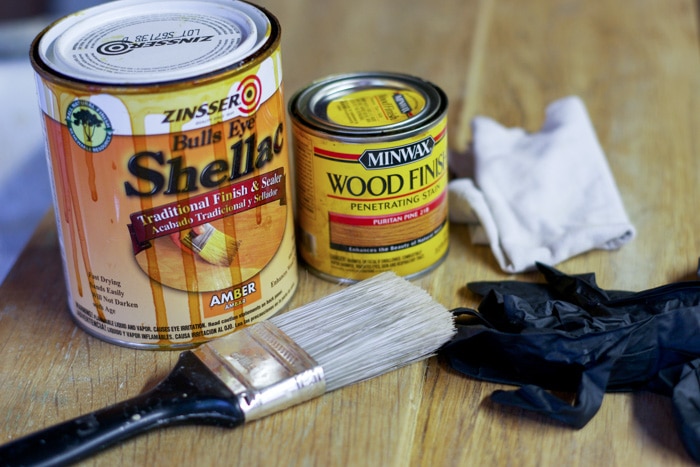
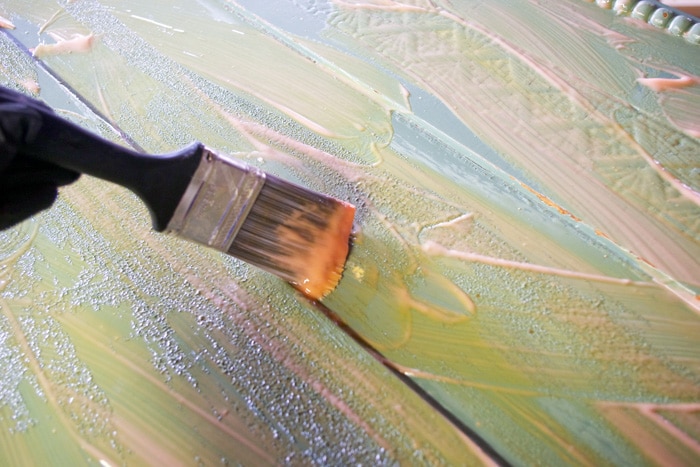
To stain the wood, you’ll need a penetrating wood stain such as this little can from Minwax. The color we chose was Puritan Pine. Stain can be applied with a piece of an old t-shirt. For our varnish (sealer), I’m going to use an amber colored shellac. Its use is not as popular as polyurethane, but since all of the woodwork in our home was shellacked, we’ve stuck with tradition. Either approach is fine. Grab some gloves too!
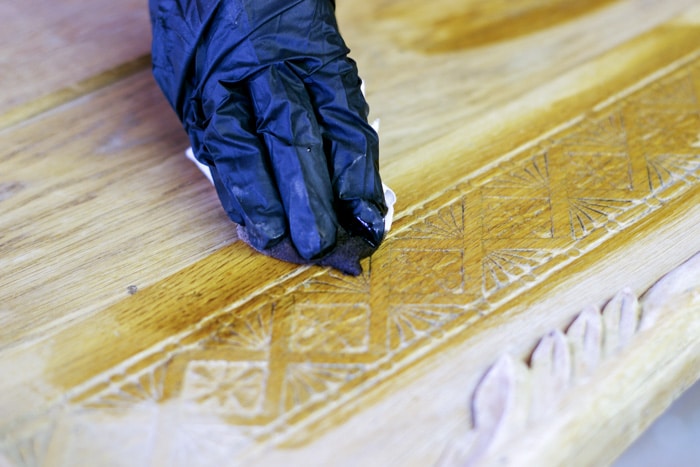
Stain goes before varnish! Apply the stain onto your clean naked wood by dipping the rag into the stain and rubbing it into the wood along the grain line. Wipe away any drips and blend in the color as best you can. If you’d prefer a deeper color, sand your stained wood with 120 grit sandpaper, wipe the dust and stain a second time.
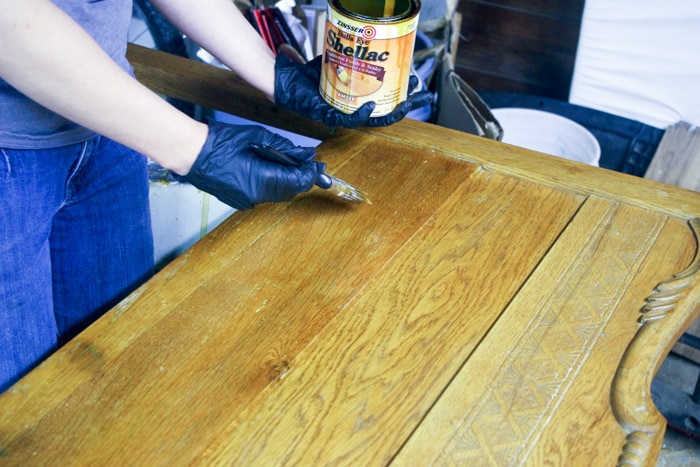
Once the stain is on, you can varnish within 4-6 hours. Here I am applying the shellac with a cheap paint brush, working left to right on the headboard. Unlike polyurethane varnishes, shellac dries fast so you need to work in long strokes, completing one section before starting another. Allow the piece to completely dry and if needed, add another coat of varnish for extra protection. Varnish also seals in the stain and gives sheen to the wood. It reveals the organic beauty of your piece!
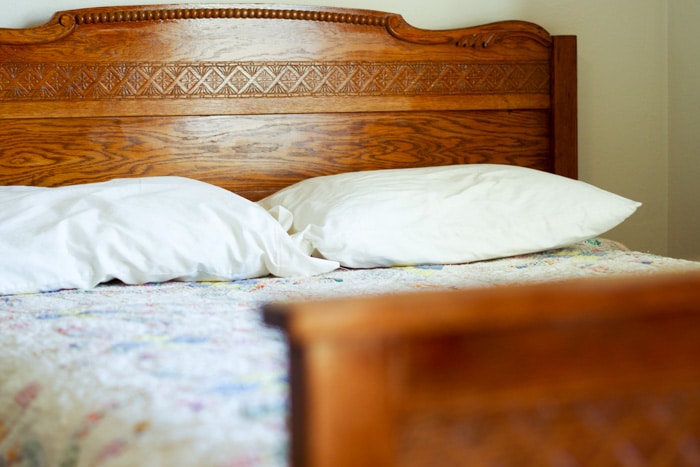
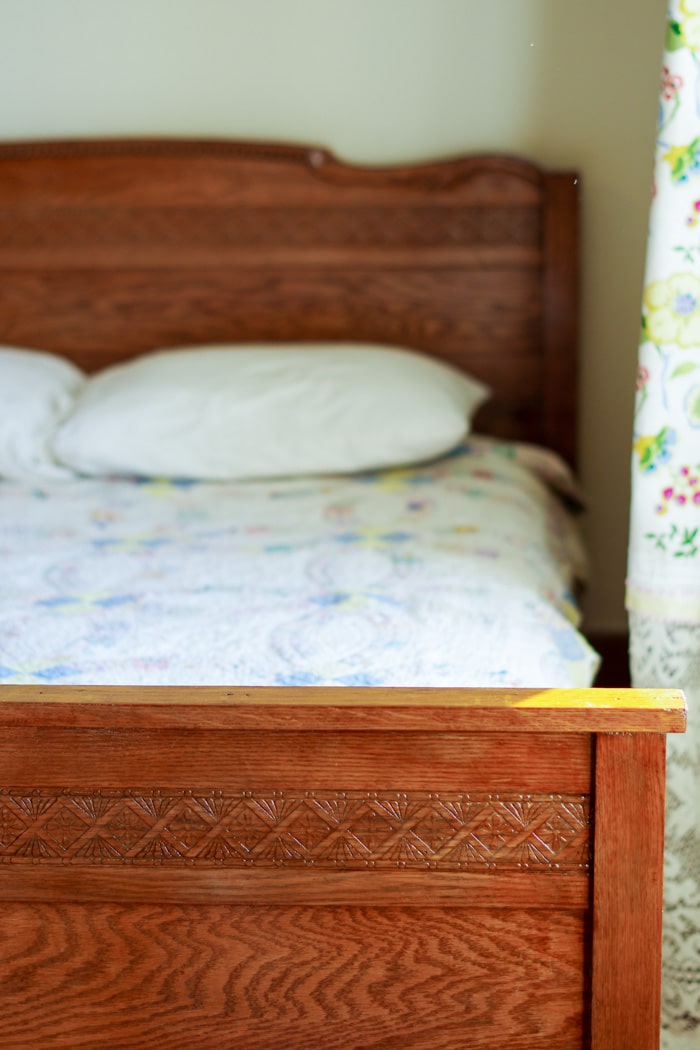
After reuniting the refinished head and footboard with its original rails, we took a step back to admire. All of the work and time I put in to this refinishing project was totally worth it. I think my grandparents would be proud of their beloved bed transformed for their granddaughter’s bedroom. Instead of all that mint green, you can see the true character of the wood; the way it was when my grandparents acquired it. And now it’s ready to be cherished in our home for years to come…starting tonight! The girls excitedly climbed into their new bed and snuggled up with their great-great grandma’s handmade quilt.
If you ask me, that makes for a very good night’s sleep 😉
4 Things I learned:
- Double your finish time. Going into this, I didn’t realize that I would decide to sand in between coats of stain or that I would end up applying two coats of shellac instead of one with several hours of dry time in between. Projects like this almost always take more time than you think especially when it’s your first go at it. Extra time also allows for mistakes to happen – See #3!
- Wear goggles while you sand! Even though I was using an orbital sander with a dust canister, my head was low enough to the project that small pieces of dust still managed to fly in my face. I walked around with red, irritated eyes for awhile. Wearing goggles (even swim goggles would work!) are a simple solution.
- Put away your finished pieces! This was my biggest mistake. After I refinished the footboard, I left it on display next to my headboard work area. When I was scrubbing the Citristrip into the detail work of my headboard, some of it splattered onto my footboard and began to eat away at the finish! I didn’t discover it until the next day and spent all morning sanding down the footboard (again) and applying new stain and new shellac. That re-do could have been avoided!
- I love woodworking. I found it really, really rewarding to refinish and preserve a sentimental piece of furniture. It really doesn’t matter what type of wood you are working with. A shade of stain and top coat creates beautiful results. Working with wood is forgiving too. When you don’t like something, sand it down and try again.
*Please remember that some old pieces of furniture may have lead paint. Always make sure to test for lead paint using a lead paint test kit. You can find one here. If lead is found, please research ways to remove the lead paint. Those instructions are not shared above.
Table of Contents
More furniture DIY tips:
Want to save this recipe?
Enter your email & I'll send it to your inbox. Plus, get great new recipes from me every week!
How to Chalk Paint Furniture
How to Gel Stain Cabinets

How to Spray Paint Furniture


Comments & Reviews
Ok! Good to know. And thank you for responding! I have never worked with Shellac, so I don’t know that I’d be brave enough to try it on the piece I have. But the outcome you got is almost identical to what I’m hoping to achieve.
Hey Amanda!
Thanks for your comment! 🙂 The shellac I used has an amber tint added to it. It’s not clear….more of a deep orange. When applied over stain or even unstained wood, it will give a darker appearance. I hope that helps!
Hi!
I LOVE this project. I recently purchased an antique bed frame with a very similar style. I love the color of the bed in your final photo, but it looks so much different than the photo of when you are applying the stain. Does the shellac make it darker? Or did it get darker because you did two coats of stain?
Thanks!
Amanda
Hey Amanda!
Thanks for your comment! 🙂 The shellac I used has an amber tint added to it. It’s not clear….more of a deep orange. When applied over stain or even unstained wood, it will give a darker appearance. I hope that helps!