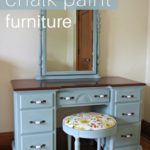

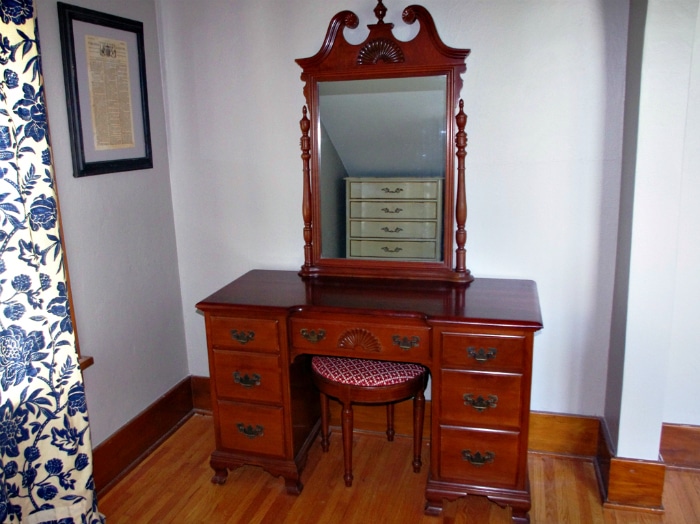
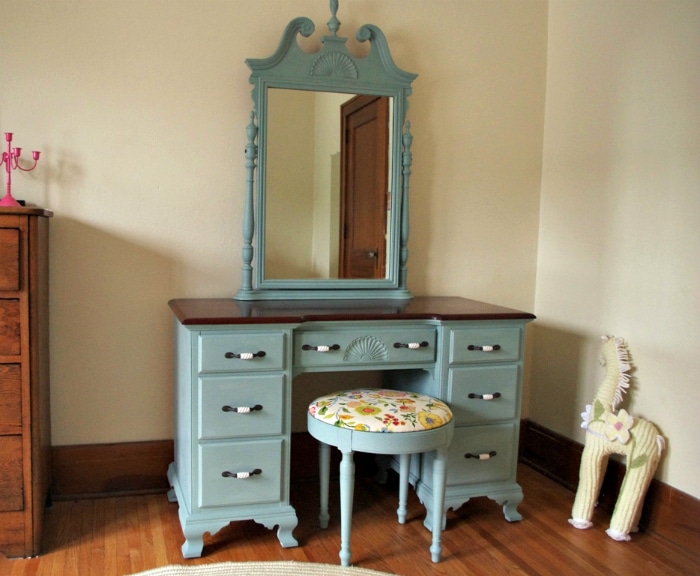
Have you ever wanted to change up your furniture? Let me show you how to chalk paint furniture. We received a cherry vanity from dear friends cleaning out family treasures. At the time, I didn’t have a specific need for it, but its reminder of my own mother’s vanity (where she put her makeup on every morning) along with its ornate look and character, I knew I could find a need! The top was bit scratched and stained, so before we displayed it in our bedroom, my husband refinished the top and I recovered the seat. That was nearly two years ago.
Now, with little girls in our home, I began to envision the piece in a soft blue color with feminine touch in the seat and handles. The vanity would sit in their room as a place to dress up, apply make-up and jewelry or perhaps even serve as a place for late night homework?
I’ve done my share of refinishing and painting furniture, but recently, I decided to try chalk paint because I heard it requires little to no prep and creates a beautiful aged look. Unlike your typical latex paint, chalk paint has no sheen and dries within minutes. A thin layer of clear or antique wax is then applied on top of the paint, sealing the paint.. Today, I’m going to walk you through the process of chalk painting using Annie Sloan brand chalk paint in five simple steps. I’m using Annie Sloan paint because I’ve heard it is the queen of chalk paints. Although more expensive than home store chalk paints, I wanted to see if her paint was really worth the price. I am not receiving any free or discounted product for using her paint.
Are you ready to chalk paint with me?
Step 1:
Create your Vision
Before you even pick up a paint brush, Think about where you want to paint. Just because you have an entire piece to work with doesn’t mean you have to paint the entire piece. For example, because my husband did such a wonderful job refinishing the top a couple years ago, I’ve decided to keep it unpainted. Another thing to think about is color. If you choose Annie Sloan, you’ll only have about 30 colors to choose from. Search online for pieces of furniture in different colors and see what you like. I am going to use one of her most popular colors – Duck Egg Blue. Finally, have you thought about distressing? Chalk paint is said to be the easiest paint to distress because it chips instead of peels. Wax is applied after the distressing to hold the look. Since this is my first piece using chalk paint, I’m not going to distress it. Finally, think about your cosmetic touches. I’m planning to recover the seat to match the curtains in the girls’ room and change out the handles for our own taste.
Step 2:
Remove Hardware and Dust
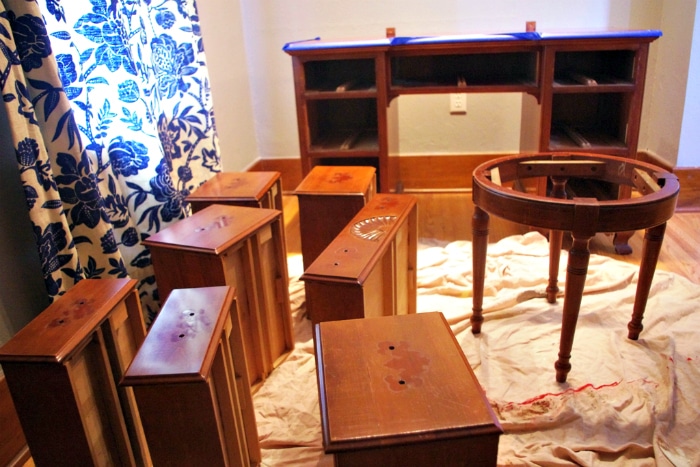
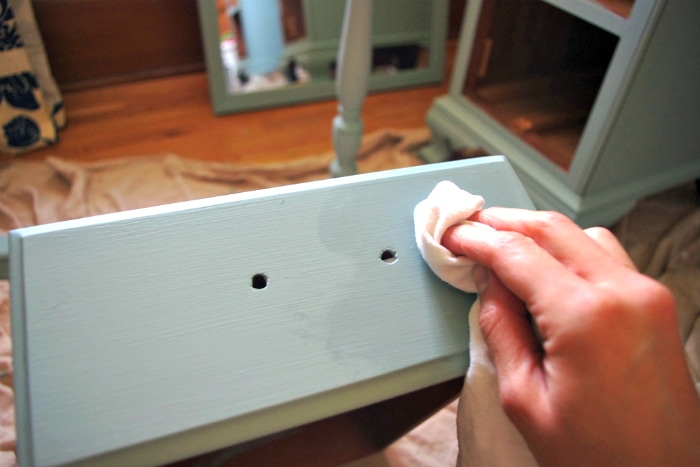
Using basic tools, remove all handles from the drawers and keep them in a safe place if you plan to use them again. Next, using a dust cloth, remove all the lose dust bunnies that seem to collect in the nooks and crannies. Our piece has a shellac coating on it that seems to attract dust on a daily basis. Since we aren’t going to sand or prime the wood, this is our only prep step. It’s really important to remove the dust because we don’t want to paint over it. Also, I am assuming that your piece has no damage. If your piece does (holes, uneven wood, etc) you will need to follow protocol for fixing the piece before moving on to step 3.
Step 3:
Gather your Supplies
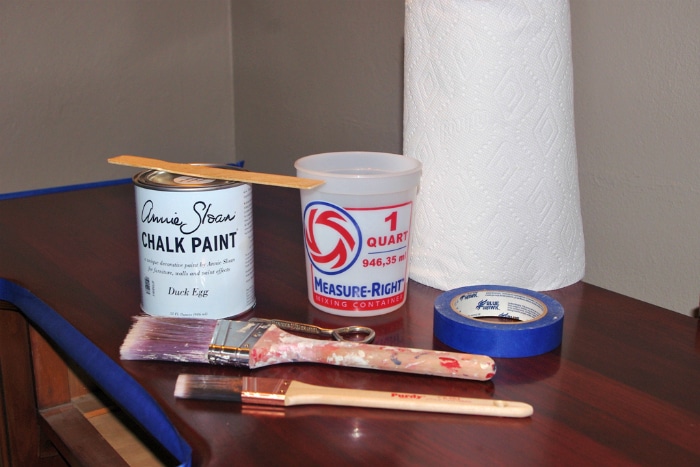
We are ready to paint – already! For supplies, I recommend both a trim brush and a wide brush, painters tape if you are going to leave part(s) unpainted, paper towel, stir stick, can of paint, can opener and stir stick and also a container to put small amounts of paint in as you work. Working directly from the paint can is heavy business and more likely to cause spills. Notice I don’t have a roller in this picture. Chalk paint is not designed to be used with a paint roller. It’s the old fashioned brush-on. Later, I will show you the simple supplies needed to apply the finish wax.

Step 4:
Paint!
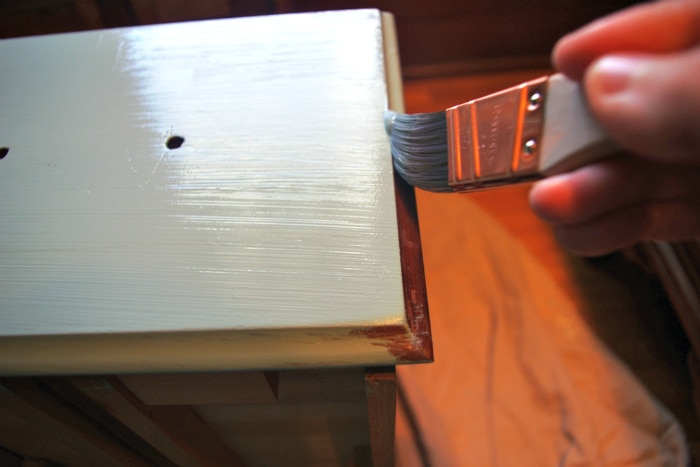
Using your wide brush and working FAST, apply the chalk paint while following the grain of the wood. Here I am painting the main square of the drawer with my wide brush and following up on the edges with my trim brush. Don’t worry too much about messy brush strokes. Because there is no sheen to this paint, you will barely see them when it dries. Chalk paint is really good at covering imperfections. Working fast is more effective than trying to be the perfect painter. Chalk paint dries quickly, so once you’ve painted an area, move on. And don’t try to paint during a time when you may be interrupted.
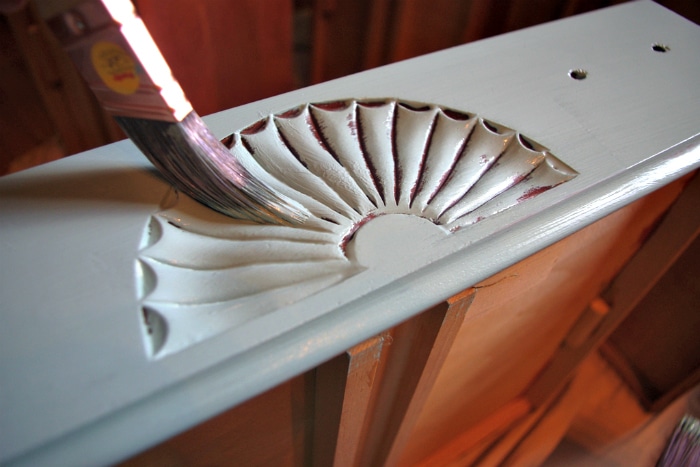
Sometimes you’ll have pieces with carved designs or intricate spaces. I just used my trim brush to work the paint into each crevice, taking care not to leave pools of paint or drips.
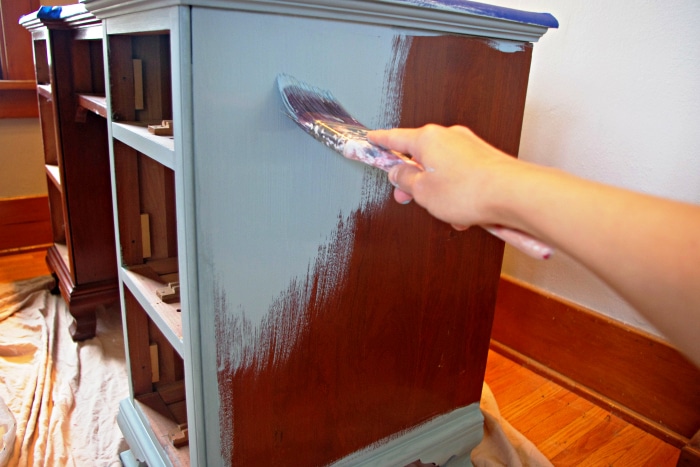
In large spaces, use your wide brush again to apply the paint along the grain. Because the paint covers so well, you really aren’t adding more work without a roller. Work quickly from one side to the other. From this picture, you can see that I could have gotten away with just one coat, but the color wasn’t completely opaque. Annie Sloan suggests 1-2 coats depending on the original color of the piece. Since I painted the first coat in less than an hour, I decided to paint on a second, thinner coat later that day.
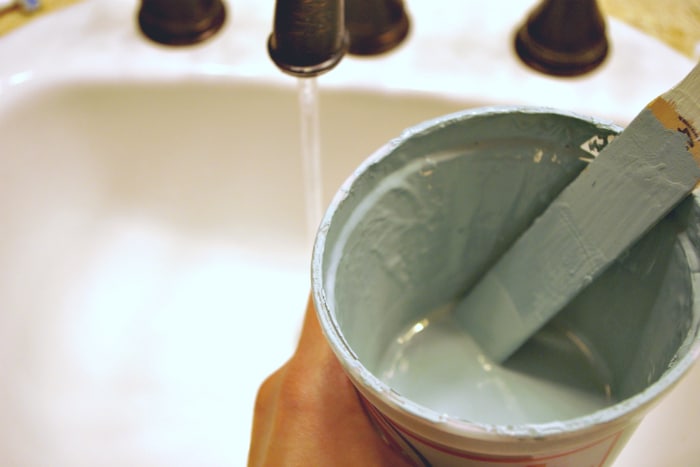
The beauty of chalk paint is that you can thin it with some tap water! I added about 1/4 cup water to my cup and painted the entire piece a second time to make sure the color was completely opaque. This took about half the time since it was the second coat and the paint was thinner. If you thin your paint too much, Annie Sloan says you can leave it out in the open to evaporate some of the water. It will thicken up. You can actually do this thinning or thickening process with the entire can!
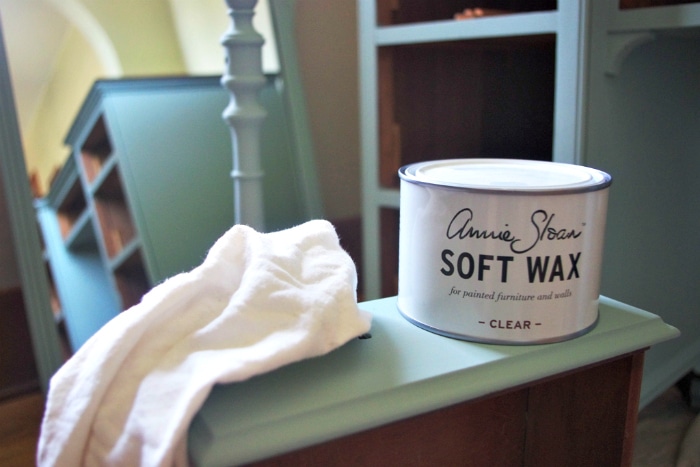
Step 5:
Apply the Wax
I had two coats of paint on my vanity in less than a day. So fast! I could have also waxed it soon after, but decided to wait until the next afternoon to apply it. For waxing, all I needed was Annie Sloan’s clear wax and an old rag. Remember I’m not going to distress it before waxing and I’m not going to use her dark antique wax to make it look old. These are great options, but I wanted to keep it simple!
Motioning in circles, apply a small amount of wax onto your rag and rub it into the piece, working from one side to the other. You can see where I have applied the wax. Its purpose is to bring out the color of the paint while also sealing it. If water gets on the piece, the wax will protect the wood. Pieces that are going to be used in the kitchen or dining area should get two coats of wax. Since my piece is just going into the girls room, one coat was fine.
Once dry (just a few minutes!), waxed pieces should not be tacky. If they are, too much wax was applied. A simple fix is to take a dry rag and wipe off extra wax until it is no longer tacky. You can use your piece right away, but use it gently. Similar to latex paint, it takes a couple weeks for the piece to fully cure. Also, you are free to apply another coat of wax every couple years to keep an optimum water seal. This is no big deal because her 15 oz. can of clear wax will probably last until after my death! I barely skimmed the top of the can with this project.
My 5 favorite things about chalk paint:
1. Little Prep Work – really! – If your piece is in good condition, all you need to do is remove hardware and dust!
2. Great Coverage – Some pieces (especially lighter wood) only require one coat. Since you can thicken or thin the paint, coverage can be easily controlled.
3. Dries FAST – You can paint and wax an entire piece in one day.
4. No Sheen AND Soft – This is a winner for me. Chalk painted pieces look original because there is no sheen on them. The waxed layer on top gives them a soft feel and make them an easy clean!
5. Simple Choices – Sometimes I get overwhelmed with the amount of color choices in latex paint. With Annie Sloan chalk paint, there are only 30 colors of paint and two waxes. Of course, there are numerous combinations if you mix the paint and wax together or use some of her more advanced techniques, but from a basic standpoint, the process is very simple.
Would I buy Annie Sloan chalk paint again? Yes. I paid $40 for her quart, but only used 1/3 of the can. I cannot imagine a more quality paint. The saying, “you get what you pay for” is really true here. Her paint did the job well! The clear wax was almost as pricey as the paint, but it was a dream to work with and I will never need to buy it again. A little goes a long way.
A passed down piece from friends is now a treasure for our girls. I hope they will enjoy it for years to come! If you try chalk painting too, feel free to comment your thoughts below 🙂


Comments & Reviews
Looks gorgeous
Hi! You didn’t mention about getting paint on the mirror or if you taped it first. I had planned to tape around the frame first but if I can omit this step it would be quicker. Thanks
Hi Bev!
By all means, if you are a good painter you can omit the taping and paint away! Unwanted paint can be removed from mirrors fairly easy with small razer blade. On the flip side I did tape around my mirror. It really didn’t take that long to tape… up to you!
Do you have any idea of the manufacturer of this piece? I lost everything to fire and trying to give insurance replacement info. It was given to me and I never bothered to look. Any help would be appreciated.
Hi Regina!
Sorry to hear that you had a fire! Unfortunately, this piece was also given to me and I don’t have anymore information. I looked underneath and around, but I didn’t see any visible markings on unpainted surfaces. I have seen other pieces similar to this from time to time on the internet so hopefully you will get your answer soon!
I’m so excited! I decided to give my daughter’s bedroom set a new look. So I used chalk paint to do her bedroom set. I love chalk painting! She thought I was new furniture.
Hummm what’s next! Thank you for the quik lesson! Off to painting!
So glad you enjoyed chalk painting as well! How special for your daughter. Thanks for the positive feedback 🙂
Love this! I’ve never used chalk paint because I read that the paint wears off easily. Is this true? Is the wax greasy? So confused. Please help. Also, where do I buy the paint?
Hi Gina!
It might be that chalk paint wears off more easily on high traffic surfaces such as dining room tables where you will have spills, sharp silverware, etc. but in those situations, you would want to apply two coats of wax. I have only chalk painted dressers and vanities and have had no problems. The wax is not greasy. If you feel a tackiness to it, you have applied too much wax. I typically wax, wipe and let it “cure” for a day or two before using it gently. I bought my chalk paint from an Annie Sloan dealer in NW Ohio. It’s expensive, but I really like the quality of her paint. Other places like Lowes and Joann Fabrics also sell chalk paint at a much lower price.
I just finished a dresser with latex paint and although I love it, it was a ton of work, sanding, priming etc. I love the idea of less prep. with the chalk paint, and wondered if you can still clear coat over chalk paint for a satin finish ?
Hi Lynn!
Great question. It is recommended to only apply a polycrylic protective finish as long as it is your last and final coat (no more adding chalk paint or wax once it’s applied). Minwax brand makes a polycrylic clear coat finish. From my research, it is advised to NOT use a polyurethane.
I think you will like the ease of chalk painting! 🙂
I’m going to try this on an antique pie cabinet (with tin on the sides) in my new house in Florida. It’s just stained but I want some color. It’s from around 1870. When my mom redid it, she went through seven coats of paint!. Thanks for the tutorial!
Love that! Send me a picture when you finish!
I found this a great tutorial but unfortunately, here in NZ, no one seems to know what chalk paint is! They think you are asking for blackboard paint. Haven’t tried to find furniture wax but will probably be told to buy furniture polish! Will keep on looking though
Sorry to hear that Anne! Have you tried Joann Fabrics? They sell their own version of chalk paint in store. Otherwise, you can order chalk paint online. Lowe’s sells furniture wax made by the brand Minwax that is relatively inexpensive. Hope that helps and best wishes!
Ann, I’m in Sydney and they also haven’t heard of chalk paint. You can make your own with Plaster of Paris, hot water and the paint that you want. It’s on Pinterest. Hope this helps
Thanks for sharing!
Far& above ‘the’ most informative & easy to follow tutorial on chalk painting I have found! And believe me I have been looking for quite some time. I have two older pieces of dining room furniture that I plan to paint. I would like to antique them. Could you help me with tips on what I would do differently?
Hi Margaret!
You will want to apply at least one coat of clear wax FIRST and then the antique wax. The application is the same, but with antique wax, you will vary the amount of antique wax on your rag depending on how “old” of a look you are going for. For example, if you only want a subtle antique look, use the tiniest amount of antique wax and work it in circles. The brown hue of the wax will work its way into some of the grains of your wood and give a darker appearance to the paint color. Wipe clean, step back and see if you like it. Not dark enough? Work more in with your rag. The key to applying antique wax is consistency. Try to maintain the same amount of antique wax for all areas of your piece.
Hope that helps! 🙂
Meredith
Since I have never used chalk paint before this was really really helpful!! Thank you so much. Hers hoping my side tables come out as good as yours!!!