This post has been a long time in the making. I had thought about gel staining my cabinets for months and finally jumped in this winter. Maybe it was the winter boredom that seems to happen around January, but whatever the case I set out to research this craze and update our bathroom vanities. You may be wondering “how to use gel stain on your cabinets” like I did and become overwhelmed by all the tutorials out there. I did. I watched YouTube videos, I read blogs and I realized that the results were spectacular and that very easily I could achieve this amazing dark java look.
Well, it’s now March and I’ve finally been able to process the entire process. First, this is a very time consuming job. That part I knew going into it. But what didn’t happen was the exact same results that everyone else magically had. However, I’m not totally sad I did this project. I definitely think it was worth it for us in our situation, but I’m not sure gel stain is for everyone. Hopefully this LONG post will help you make that decision.
How to Use Gel Stain on Cabinets
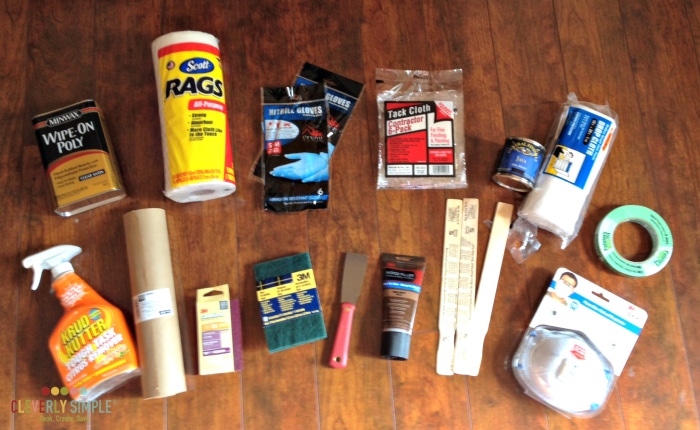
First, let’s talk about the supplies. Almost every single tutorial I read talked about how inexpensive this gel staining project would be. And while it is cheaper than buying a new vanity, it’s not less than $20 which is what most blogs I read talked about. Sure, if you have all these supplies to apply the gel stain correctly, it will only cost you the can of gel stain, but I personally did not have it all so it was pricey.
Here’s everything you need to gel stain.
Krud Cutter (to clean off the cabinets)
Paper Liner (to protect your floors and walls)
Painters Tape (to tape down the paper liner and protect your walls)
Sand Block
Srubby Sponge (to use with the Krud Cutter)
Putty Knife
Wood Filler (if you’re planing to change the knobs)
Paint Stir Sticks
Paint Ventilation Mask
Rags
Nitrile Gloves (At least 6 pairs)
Tack Cloth
Plastic Tarp
Steel Wool (very fine, 0000)
Sponge Brush
And for those who have everything, all you need is:
Wipe On Poly
Gel Stain
And for those like me that really are starting from scratch:
Knobs
Hinges
What I didn’t have to buy:
Old socks!
So, yeah. It was over $100 to do this project. Still, it was less than replacing the three vanities so I wasn’t sad about the cost, I just wanted to make sure you were hearing the real truth of what this kind of project costs.
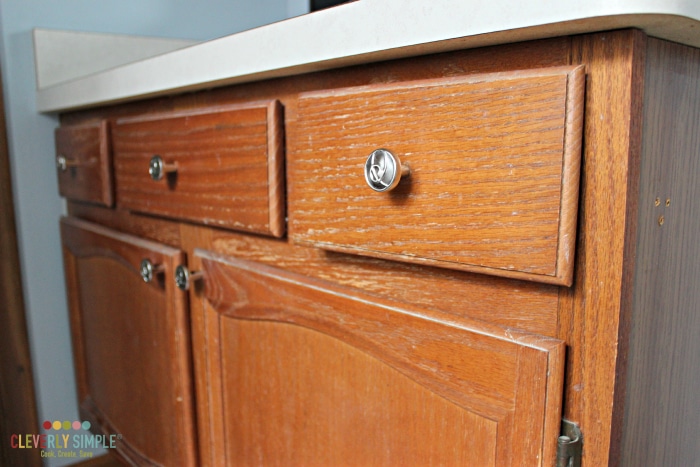
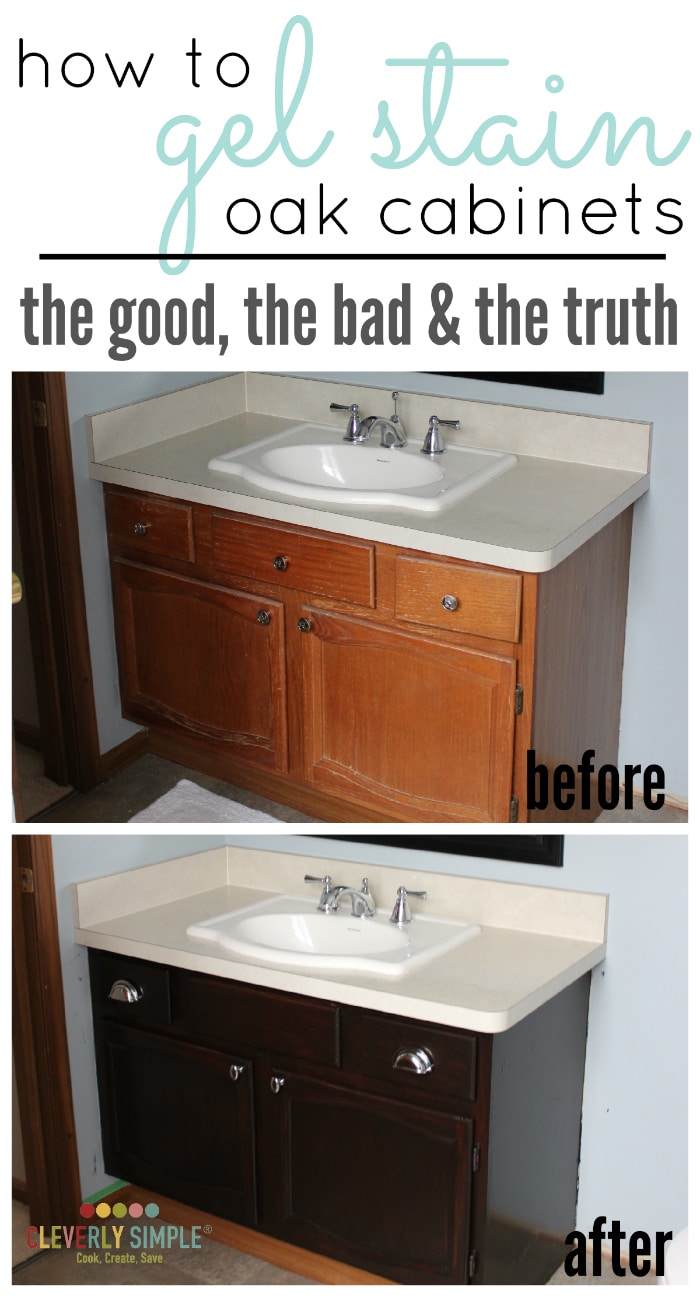
Here was my cabinet before staining. I had scrubbed it with the Krud cutter. We bought a foreclosure and it was evident the house was not cared for, for quite awhile. I still feel like after three years we’re still cleaning up the grime and this project was no exception. As you can see, the cabinets just look beat up.
I’d like to put a little disclaimer here. Personally, I am not a fan of painting beautiful solid oak anything. However, our cabinets were too far gone. I grew up in a home built in 1905 and remember the hours upon hours my parents talked of stripping all their beautiful woodwork in our home. So, generally speaking I’m a purist when it comes to historic homes and their oak cabinetry and woodwork – this 1986 foreclosure house, however, needed some gel staining love.
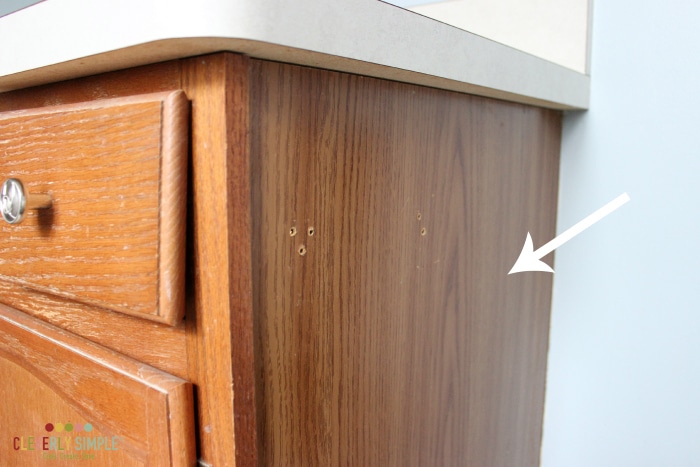
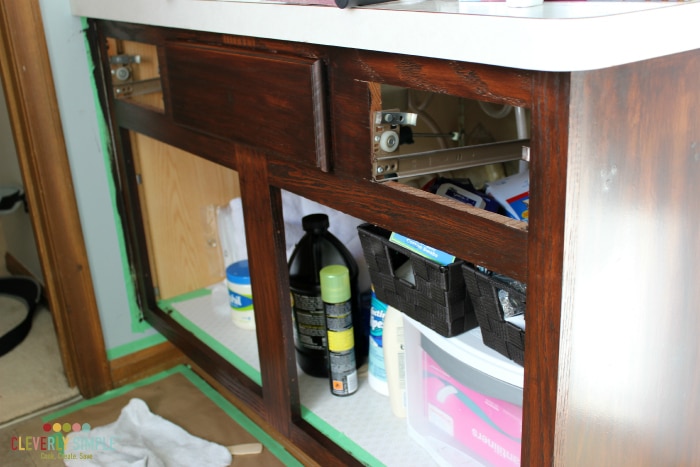
One of the other things I was interested in testing out with the gel stain was the veneer side on one of our vanities. I mean, why do they provide solid oak cabinets and then put cheap wood print on the side? It makes no sense to me. I was excited to cover that baby up.
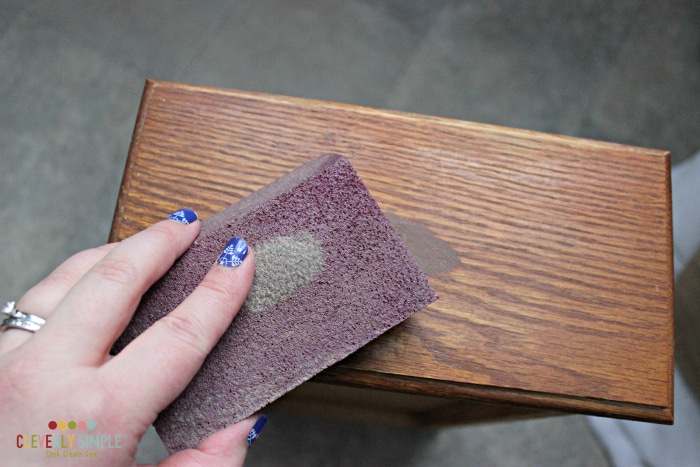
After filling the knob holes with wood putty and letting them dry a full 24 hours, I started to sand. This process went pretty quickly. The doors were already beat up so sanding actually made them look better. Ha! Because this is gel stain, you don’t have to sand like you would with regular stain. That is the appeal to me with gel stain.
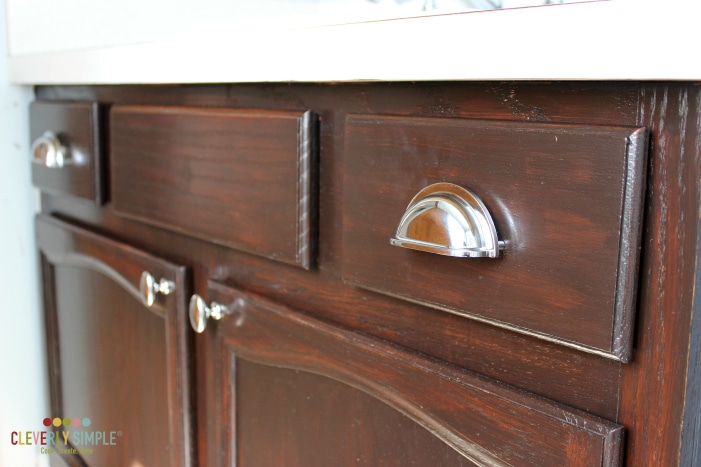
You can see where the putty went. Please READ this very carefully – if you are going from a knob with two holes to one with a single hole, don’t do it. The putty was still visible after staining. I’ve done a few projects with stainable putty and it never looks right. I’ve done a light putty before staining and then with this one chose a dark putty so that it might blend in better. It doesn’t. I wasn’t too worried about filling these holes because I was going to purchase these drawer pulls. I knew they would cover any mistakes, and really I could have just not filled the hole but I wanted to again try out putty to see if you could really stain it – be forewarned.
After taking the vacuum cleaner to my cabinetry to clean up the sanding dust, I then took the tack cloths and went over them to make sure every little piece of dust was gone. Tack cloths are cool, man. They’re the right kind of sticky without being sticky – you know?

The last part is to set up your room. I took off all the doors before sanding and laid them out in our larger bathroom floor. This bathroom had a window for ventilation. And yes, I opened the window when it was 20 degrees out. Brrrrr! The other two bathrooms have vents and the only thing I stained in them was the actual shell of the vanity.
Once the not-so-fun-prep is finished, I was ready to tackle the staining! I made sure to stir the gel stain very well with my paint stick. I put an old sock on top of my gloved hand – turned on the Stuff You Missed in History Class podcast and went to town.
I’m not going to lie, I really enjoyed the uninterrupted time of staining. My husband watched the kids and I could listen to an entire podcast from start to finish. It’s the little things!
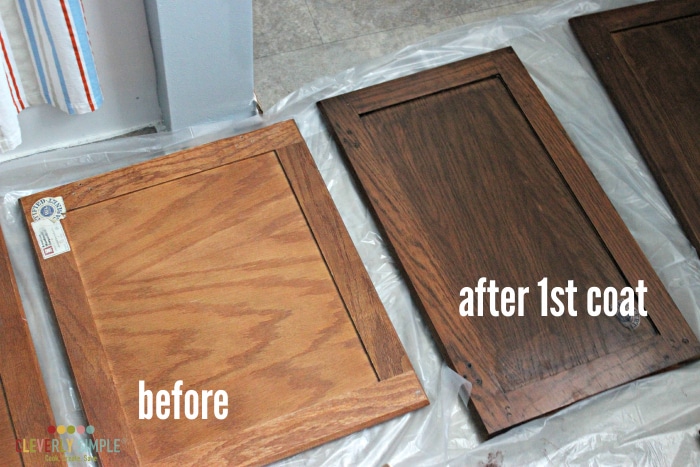
Here’s the difference between the before and the first coat. The first coat actually looks a lot more even in this picture then it truly was. I had a really hard time getting the stain to go on evenly in those little crevices. I think the thickness of the stain (the gel factor) made it really hard to make the coverage even. This was the main difference I saw from regular stain and gel stain. There is no way you could do just one coat of gel stain. That is, if you’re using the sock method. I do think you might be able to do one coat with a paint brush – but I didn’t try that method in the beginning.
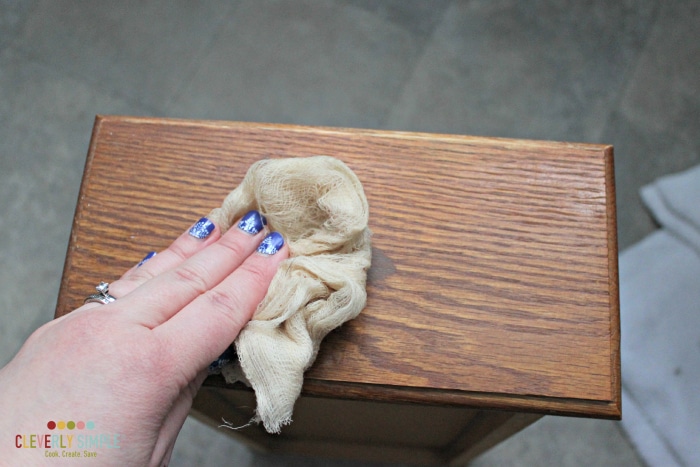
Essentially, I rubbed some stain on liberally with the grain of the wood and then used a rag to lightly wipe it off. It was really a very similar process to regular staining.
Here’s the first coat again on the drawer. Look at the stainable putty. Ugh! Granted it was dark to begin with but I knew already that it was not going to cover correctly.
I let the first coat dry for a full 24 hours. Some say you can do another coat six hours later but that didn’t really work with our schedule and I like to give a long time between coats.

Here’s another picture of the first coat on the actual cabinet. You can see how it soaks in like stain, but not so evenly.
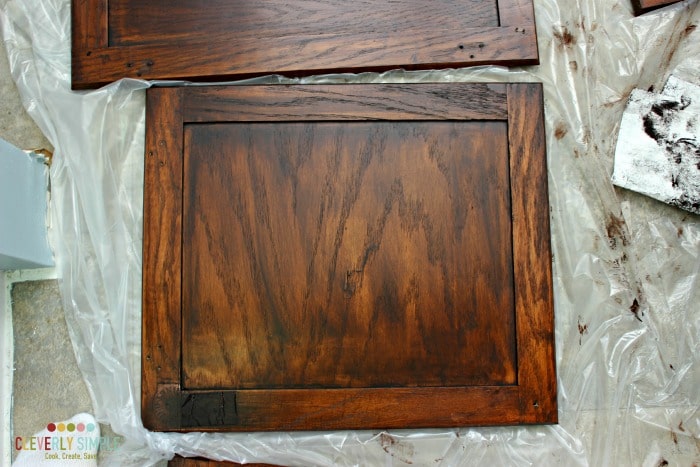
Here’s what it looked like after the second coat.
HAHAHAHAHAHA. Ha!
I mean, I might have started to really freak out if it had not been all the tutorials I read that said how awful it looks after the second coat. But really, how even can gel stain be on wood this worn?
Either way, I was obviously committed.
No turning back, baby! Here’s another view of the second coat. It looks a little better on the vanity.
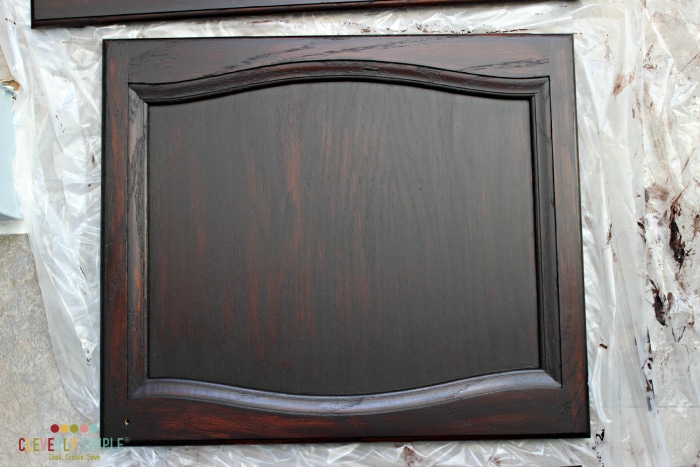
Okay, so here’s where my whole strategy changed. I put a third coat on and it looked just about as bad as the second – except darker. I almost cried. Do you see that streaky-ness still there? It just looks so uneven.
So I did what any reasonable person does and cleaned my hands off and got right back on the computer. I had remembered reading that you could paint on the gel stain and so I decided to go for that method. There was no way I was going to put 20 layers of stain on these babies to finally get it even.
I grabbed a sponge brush and very thinly placed a third layer on the rest of the doors and the cabinets. FINALLY, it started to look normal. In hindsight I wish I had painted it on in the beginning. Live and learn from me. 🙂
Here’s what it looks like after the painted on effect. Ah, much, much better. It finally looked like I thought it would. It wasn’t perfect but it was looking pretty good. I had to step away for awhile. You know when you look at something for hours and so you therefore see every single imperfection? Yes, that was me. My husband thought it looked awesome – but then again, he loves anything I do like this because he’s supportive like that – and because he didn’t have to do it. Ha! 🙂
Okay, here’s where the truth comes in. See how it’s still today a little streaky? I did a fourth coat to a drawer and it still looked like this so I decided to call it a day. No matter how many coats, gel stain does not go on as evenly as regular stain. I think if I had used a brush from the beginning, it would have been better, but as it was – this was my end result. I’m also wondering if I struggled with the streakiness because of the un-evenness of the wood to begin with. There were so many worn parts.
This picture above really shows the imperfections because of the lighting. I wanted to be able to show you that so that you can see how this really goes on. In most lights it really doesn’t look that streaky. In fact, our downstairs half bath looks more like what you see on most tutorials. This bathroom has the most light from a window that is directly across from it so it picks up all the detail.
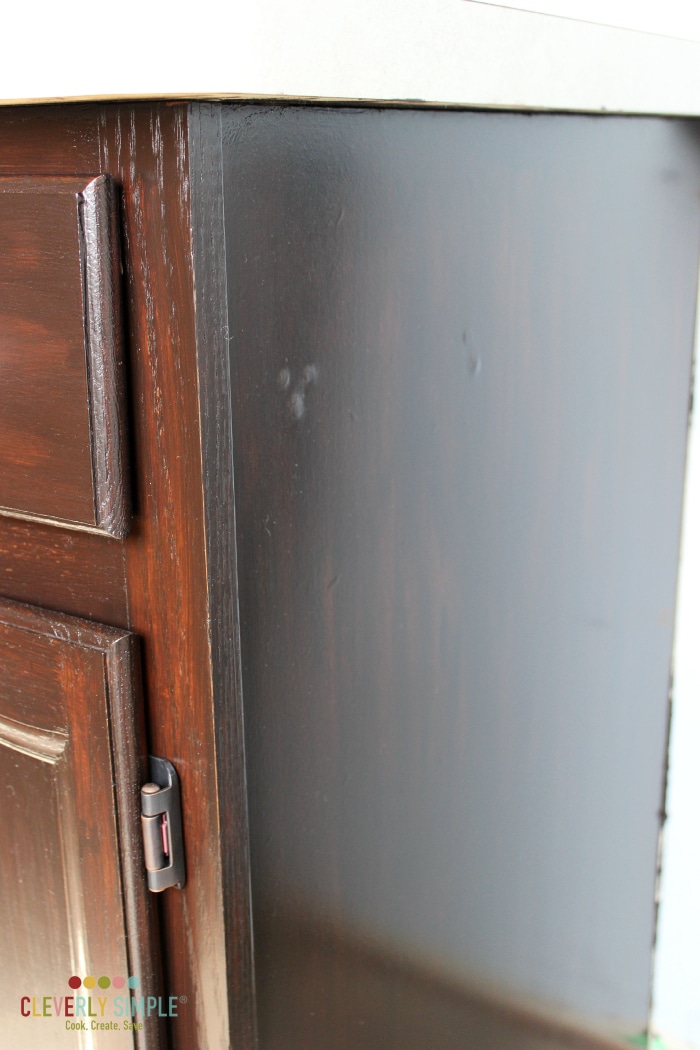
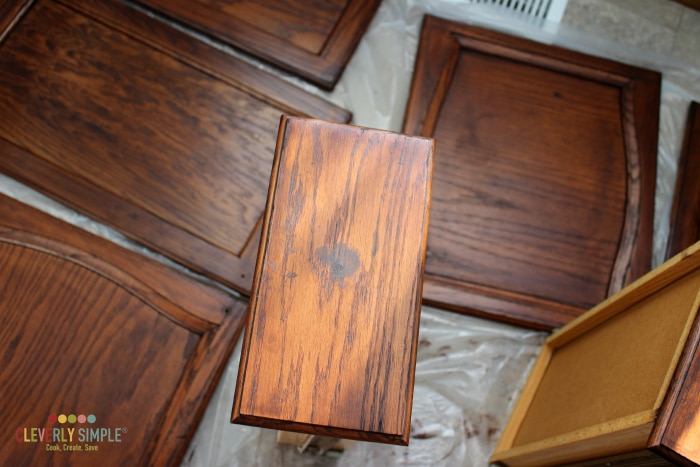
Here’s what the veneer looks like. Not bad, actually. Still a little streaky but it definitely looks better than the original.
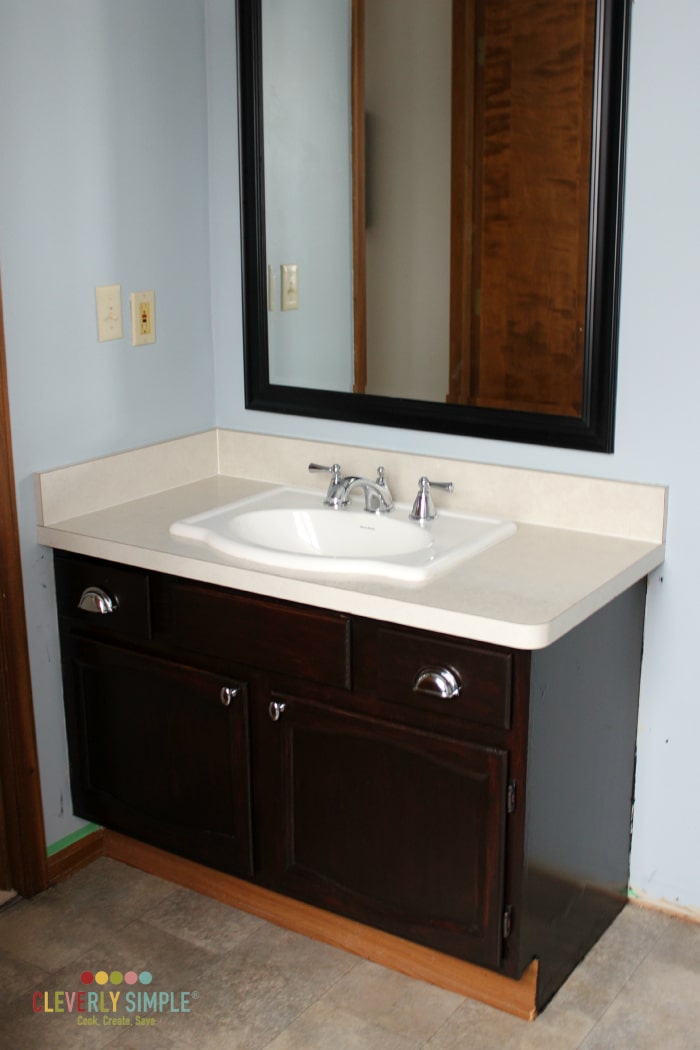
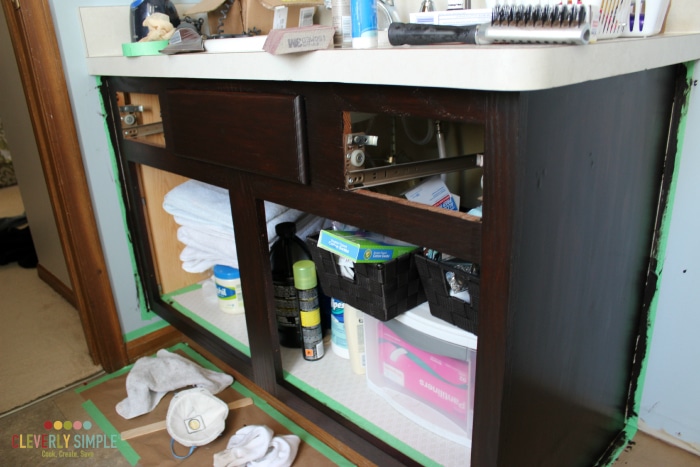
Here’s the final product! I really am glad i did this project. I do think they look WAY better. You may be wondering why I didn’t do the bottom toe kick. We’re going to be re-doing all our baseboards in the house this year and I wasn’t sure how I would wrap those around there, so I decided to hold off. I probably will end up gel staining it, though.
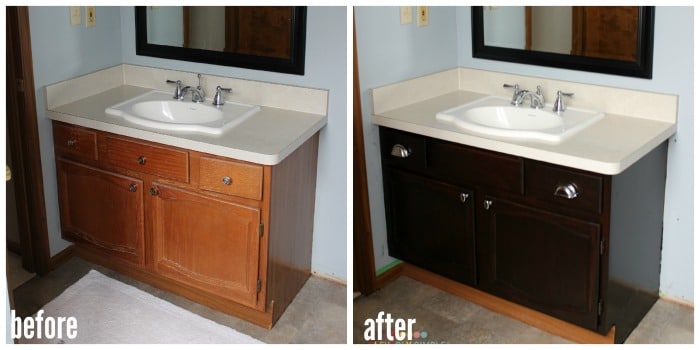
Here’s a side by side view. Definitely an improvement!
So, here’s my honest review of gel stain. I would use it again on vanities like this to spruce them up. I might even use it on furniture that I want to make a java color. It was worth the investment.
However, there is no way I would attempt using gel stain on my kitchen cabinets as others have. Maybe it was my oak cabinets, but I have never had so much trouble getting something to look even. In the darker rooms like the bathrooms in our house this worked out fine. However, my bright kitchen will not see gel stain. Instead, I plan to paint them white, which is a project for this spring. Eeeek! (Update: I decided to paint our kitchen cabinets. You can see that process here.)
If you’re looking for some good tutorials on how to use gel stain I found this video and this video especially helpful.
So, what do you think? Have you tried gel stain? Will you try gel stain? Have I scared you away? 🙂
Ready for another project? How about making some of these Cheap Simple DIY Lights?


Comments & Reviews
One other piece of info – they were oak cabinets- aged- but still sanded well. I also began with a pre stain applied. This was recommended on a few of the sites.
I also used gel stain – weathered grey.on my bath double vanity.
I sanded everything down.then I found that using a brush with a small amt of stain was easier to control.there were dark parts and light parts which looked not so nice. At my sons suggestion, I “weathered” the wood. Not sure if that’s the correct term. After each piece dried, I took a very very light sandpaper, and started with a drawer. I rubbed it very lightly over the piece, and it took on a weathered look. I also, sanded a little harder in certain area, which inthought looked authentic. I like the look, but I don’t want to coat it because I like that oldish feel to the wood. Not sure that will work out, but I’ll see, if it changes
Colors, I’ll have to do something. But without the covering coat, if I wanted to make it darker, or whatever, I would not have to sand the coating.
Hi,
Just wondering if it covered the oak grain really well. Some people say you need to fill in the grain. What are your thought?
You will still see the grain texture, but it will cover it in terms of color. It depends on what you like in terms of style. Seeing the grain did not bother me, but for some, it does.
I used general finishes Java gel stain n also used antique walnut. I followed YouTuber Pete B n his exact directions n used same brush to Paint on the gel stain…n let me tell you…it came out perfect n I never did this before. I also had old oak cabinets with a veneer side. I only needed to brush on 2 coats…1st coat was a lil streakyn icouldsee sign of old finish but I remained calm n followed Pete B directions. I’ve since gel stain a lot of my old honey oak cabinets n dud the kitchen cabinets n fireplace as well. I told my husband that if he stood still too long I’d stain him too. Lol
I used a stain bristle brush…not a foam. N used sock for other things like the topcoat. Forgot to mention that before
So glad you had success! Thanks for sharing your tips.
I used miniwax gelstain for my oak dining table and instantly fell in love. It covered great the first coat. I still applyed multiple coats and a polyurethane quick dry finish.
Thanks! This was great, I also struggled with gel stain. I learned the same way as you! Painting it on does keep it from streaking. Not my favorite stain!
Your project looks awesome !
Thank you! Glad I’m not crazy to have these kinds of results. 🙂
Thanks for the excellent insights into gel staining! The photos really helped. I’m not sure if I will go through with doing our bathrooms but I definitely will not be doing the kitchen! You gave me a lot to think about.
Glad I could help!
I used a gel stain on a bathroom under sink cabinet and had much the same results. It’s ok, I guess, but streaks are noticeable if you really look at it closely. I had to put on more coats than I wanted to because I found that the sections that were “chipped” took stain differently (darker) than the rest of it.
Agree with your experience. I think 99% of people don’t notice the streakiness but it’s hard not to notice when you do all that work. 🙂
May I ask – how is it holding up? Especially on the veneer? Any scratching, chipping, peeling, etc?
Thank you for this article.
Hi! I actually moved three years ago so I can’t share how it’s holding up today. That being said, for the first year after we did the gel stain it looked great!
After 5 years my oak is starting to show through on corners and areas that get a lot of use
i used general finishes and their satin poly over. not sure how to repair.
I just finished my 3 to 4 month update in my kitchen with gel stain. I did use a foam brush to stain with and did not wipe off. It did take 3-4ish coats to cover really well but i am now loving the new look.
I’m glad it worked out for you!
I had the same experience as you did. Streaky and uneven. But, I was doing 2 different rooms. After having trouble with the sock/rag method on the first room, it took 4 coats, I stopped and went on the GF website for their tutorials. They DONT recommend wiping on with a rag and off when refinishing, only on raw wood. They tell you to use a quality brush and go with the grain. Also, in their video they tell you it will only take 2 coats. My second project turned out beautiful! 2 coats, totally even and awesome. The bristled brush gets into the grooves better and it looks natural.
My other problem, on the first room was the sanding between coats of poly. I sanded softly, but still ended up with areas that I sanded off the stain. On the second project I didn’t sand in between coats.
Hi! Thanks for the tips! I’m glad you had success on your second room!