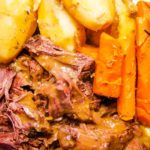
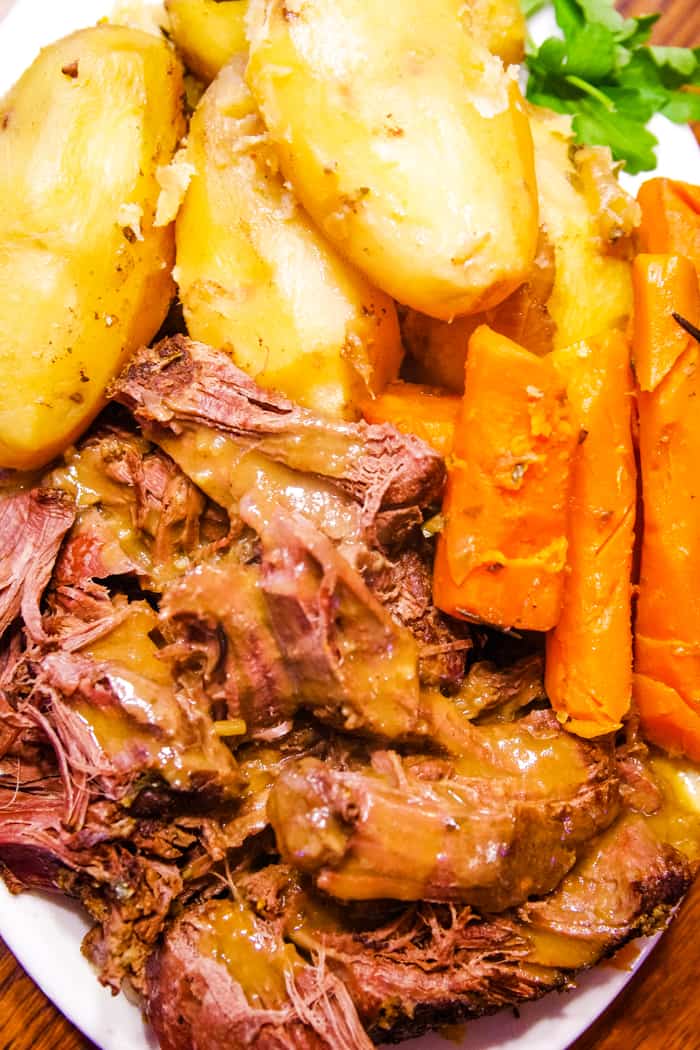
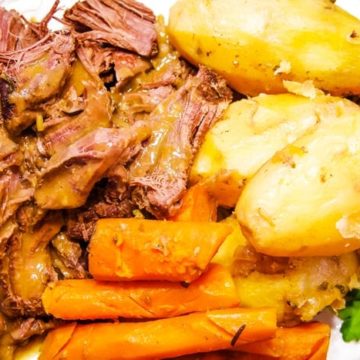
Slow-cooked in the oven, this mouthwatering venison roast with carrots, onion, potatoes is topped with homemade flavorful gravy. The whole family will love it!
If you love this recipe, you’ll also love bone-in venison steaks using the Instant Pot or baked hunter’s casserole with ground venison; they’re all a family favorite.
Today I’m excited to show you how to make a mouthwatering venison roast with carrots, onion, potatoes and an incredible gravy made from six hours of slow cooked flavor in the oven. With wind chill temperatures setting new records this week, there is no better day to turn on the oven and fill my home with the aroma and warmth of roasted venison. Simple, healthy and so, so, so good.
Table of Contents
Why Cook Venison Roast In The Oven
There are varying ways I like cook different cuts of meat and venison is no different. I have made bone-in venison roasts in my pressure cooker, but prefer the oven every time. Why?
- Roasts are the largest cuts of meat on a deer and are typically served with roasted carrots and potatoes, making a large sharable meal that needs the space of a stockpot.
- The oven gives plenty of time for the meat drippings to blend with everything in the pot so you can make the most delicious gravy.
- What about the slow cooker? I still prefer the oven. To me, the perfect baking temperature for a bone-in venison roast is 250 degrees, which is not an option on conventional slow cookers. The typical high of a slow cooker is 300 degrees and the low setting is only 200 degrees.
- The oven allows you to bake your roast using the same pot you seared your vegetables and browned your meat – adding even more flavor. I learned this trick from The Pioneer Woman. She is one smart lady!
Are you ready to make a spectacular baked venison roast to share with your loved ones?
Want to save this recipe?
Enter your email & I'll send it to your inbox. Plus, get great new recipes from me every week!
How To Cook Venison Roast In The Oven
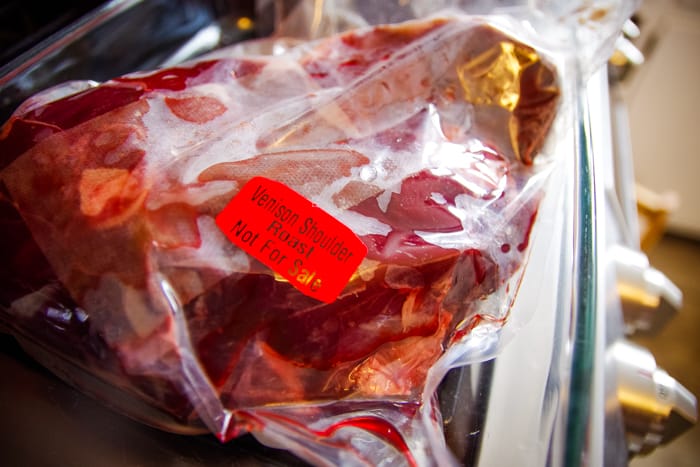
Step 1: Let thaw if frozen. Here is my three-pound venison shoulder roast. Thank you, hunter husband! I took it out of the freezer yesterday to let it thaw in the refrigerator overnight. Unlike my venison steak recipe, venison roast is best cooked when the meat has been thawed out and browned.
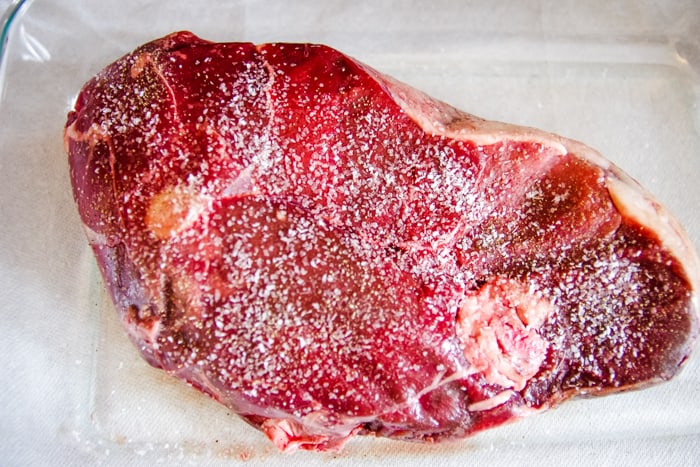
Step 2: Take the thawed meat out of the package and generously season both sides with kosher salt and cracked black pepper. Set it aside to rest as you prepare the other ingredients. Turn your oven on to 250 degrees.

Step 3: You will need 5-6 peeled and chopped carrots. I never halve the length because the oven will give them plenty of time to tender up. Slice up 1 medium yellow onion and peel 4 garlic cloves. You will also need one sprig of fresh rosemary (another trick from The Pioneer Woman that makes such a difference!), fresh parsley, and some onion soup mix. I like to use the homemade version. All of these ingredients will cook in a small amount of quality beef stock. Don’t worry if this seems like too much salt. We will add potatoes later during cooking, and they will need them.
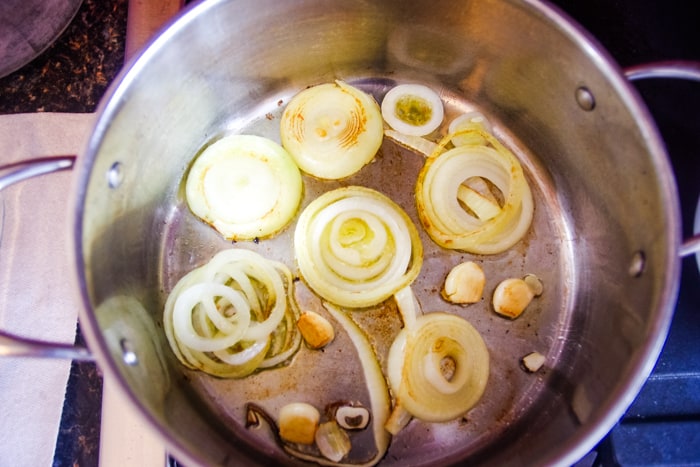
Step 4: Heat a large stockpot over medium-high heat. When the pan is hot, pour in a generous amount of olive oil (approx. ¼ cup). The oil has to last us through the searing of two batches of vegetables and the meat. When the oil is hot, place your onion rings and garlic cloves in the pot.
Cook for 2 minutes on each side or until the onions are translucent and crispy brown edges are formed. Be careful not to burn the garlic. If it helps, you can start with the onions and add the garlic halfway through. Remove the onions and garlic and set aside in a large bowl.
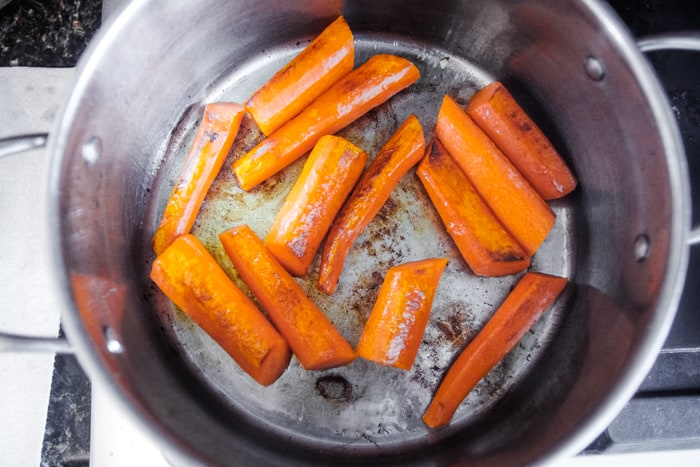
Step 5: Using the same method, sear your carrots for about two minutes per side. Searing the onions, carrots, and garlic will bring out the sugars from the vegetables and provide an intense flavor to our dish. When the carrots start to show browning on both sides, pull them out and add them to your bowl of onions and garlic.
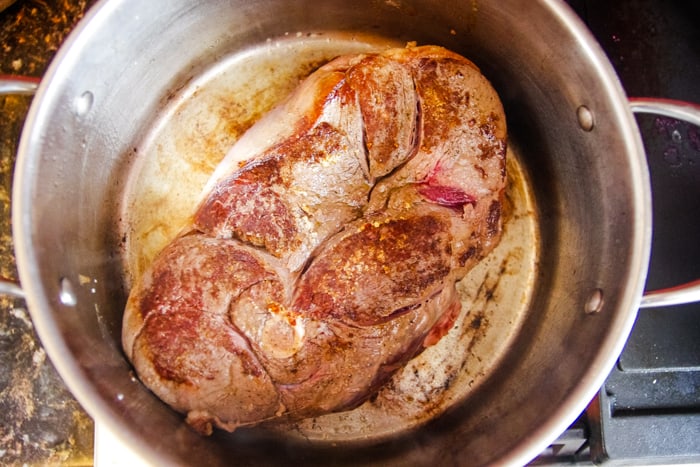
Step 6: Make sure you still have some oil at the bottom of the pan. Then lay down one side of the seasoned meat into the pan. You will hear it sizzle! Allow the meat to brown for one minute on each side before removing it to rest one more time.
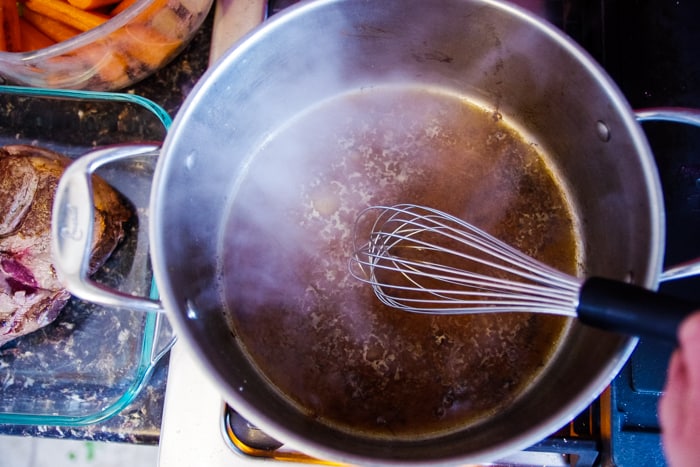
Step 7: Working quickly, whisk 1/3 cup of beef stock into the browned bits at the bottom of the pan and keep whisking until they are part of the stock. Turn off your heat.
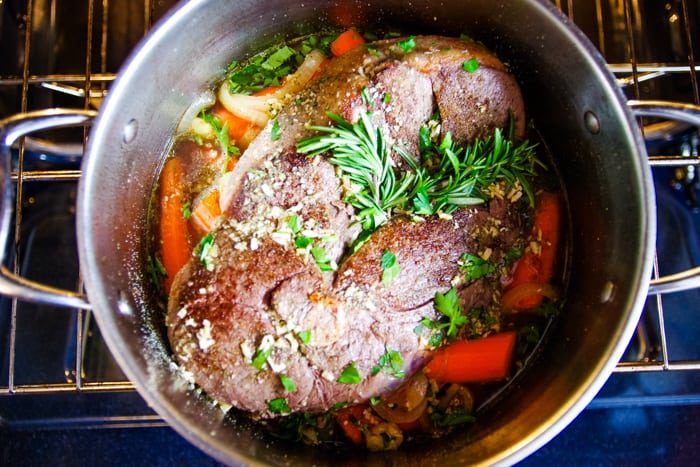
Step 8: Layer the bottom of the pan with the vegetable mixture and top with the browned roast. Split the rosemary sprig in two and lay it on top of the meat, followed by one tablespoon of onion soup mix per pound of meat. Since I have a three-pound roast, I added 3 tablespoons of mix.
Also, add 2 tablespoons of fresh chopped parsley and only 1 ½ cups of quality beef stock. We don’t want too much liquid because the fat from the meat will add some and the vegetables. Cover the pot and bake for 3 hours at 250 degrees. Your kitchen begins its mouthwatering smell about 2 hours in.
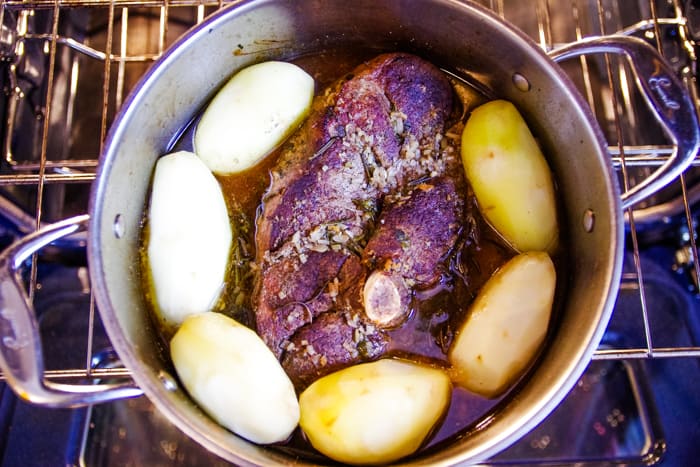
Step 9: At three hours, slide the pot out and carefully (use hot pads!) add some peeled and rinsed russet potatoes around the edge of the meat and on top of the carrots, onions, and stock. You could also use red or yellow potatoes and leave the skin on if you like that! At this halfway point, I also like to move the rosemary from the top of the meat and poke it down into the juices. Slide the covered pot back into the oven and bake for an additional 3 hours at 250 degrees.
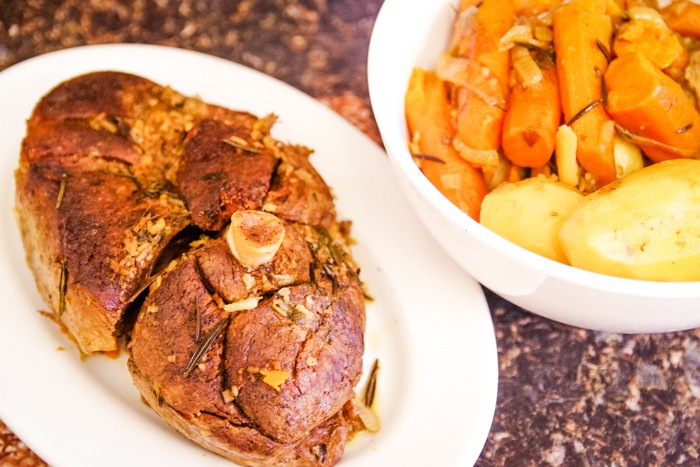
Step 9: When the six hours have ended, carefully remove the stockpot from the oven, take out the roast, and place it on a platter. Cover it with foil, so it stays warm. Remove all of the vegetables and place them in a bowl and cover with foil. Strain the remaining stock using a fine mesh strainer or a gravy separator, pour it into a liquid measuring cup, and set it aside.
How To Make Venison Gravy
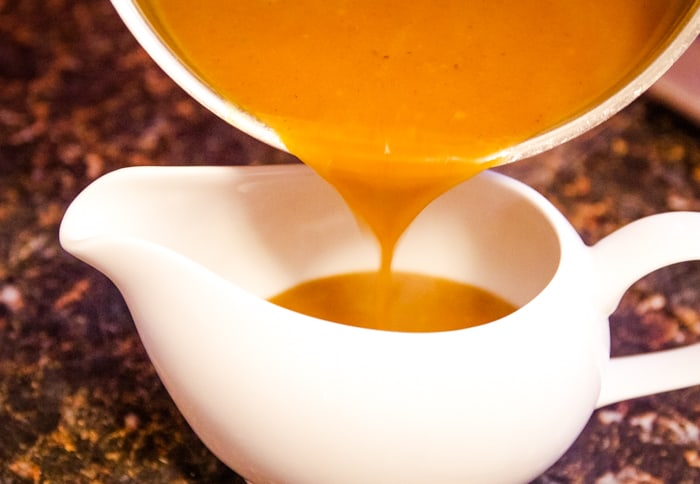
Since our roast cooked for so long, we will have some incredible pan drippings to make gravy.
- After you have removed everything from the pot, add 2 Tablespoons of unsalted butter.
- Melt the butter and then add 3 Tablespoons of flour (or potato starch for gluten-free friends), whisking them together to form a paste.
- Allow it to cook for 1 minute before whisking in your reserved stock and drippings. Whisk just until it is thickened and turn off the heat.
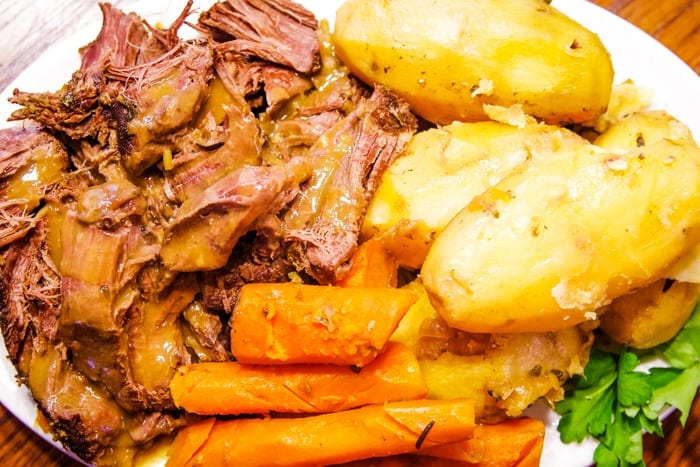
This picture does not do justice to the aroma in my kitchen, the tastes in our mouths, and the warmth in our bellies. A true venison roast dish at its finest with roasted carrots, potatoes, and …oh, that gravy! Seriously. I love being married to a hunter 🙂
Stay warm…. and enjoy!
How To Make Venison Roast Video
Venison Roast Cooking FAQ
Our recipe calls for a baking temperature of 250 degrees, which is not an option on most conventional slow cookers. In addition, you can pre-sear your vegetables and brown your meat (both important steps) in the same pot used for baking.
Searing the onions, garlic and carrots will pull out the sugars from the vegetables and remove some of the water. The result is more flavor for our dish.
Browning meat before cooking is really all about flavor. The caramelized surface of the meat will give so much more flavor to the final dish… plus it looks more appetizing!
Yes, you can prepare the roast as featured (minus the 1 ½ cups of stock) and place the entire stockpot in the refrigerator to chill for up to four hours before baking. When ready to bake, add the additional stock. You can also put the chilled stockpot into a cold oven, add the stock, and set your time bake feature for up to one hour ahead.
Yes, but I still prefer the oven. The perfect baking temperature for a bone-in venison roast is 250 degrees, which is not an option on conventional slow cookers.
Venison Roast Recipe
Ingredients
Venison Roast
- 4 pounds venison shoulder or butt roast
- 1/8 teaspoon kosher salt
- 1/8 teaspoon cracked black pepper
- 5-6 large carrots
- 1 medium yellow onion
- 4 garlic cloves
- 1/4 cup olive oil
- 1/3 + 1 1/2 cups quality beef stock
- 1 Tablespoon onion soup mix
- 1 fresh rosemary sprig
- 2 Tablespoons fresh parsley chopped
- 6 medium potatoes peeled or unpeeled
Venison Gravy
- 2 Tablespoons unsalted butter
- 3 Tablespoons flour
- 2 Cups Roast drippings and broth
Instructions
- Generously season both sides of your thawed roast with kosher salt and cracked black pepper. Set it aside and turn on your oven to 250˚ F.
- Peel and chop the carrots, slice the onion and peel the garlic cloves. In a large stockpot on the stove using medium-high heat, pour in 1/4 cup olive oil. When the oil is hot, lay down your onion rings and garlic cloves. Cook for 2 minutes on each side or until the onions are translucent and crispy brown edges are formed. Remove the onions and garlic and set aside in a large bowl.
- Using the same method, sear your carrots for about two minutes per side. When the carrots start to show browning on both sides, pull them out and add them to your bowl of onions and garlic.
- Make sure you still have some oil at the bottom of the pan before laying down one side of the seasoned meat into the pan. Place the roast in the stockpot to brown for one minute on each side before removing it to rest one more time.
- Working quickly, whisk 1/3 cup of beef stock into the browned bits at the bottom of the stockpot and keep whisking until they are part of the stock. Turn off your heat.
- Layer the bottom of the stockpot with the onions, carrots and garlic and top with the browned roast. Split the rosemary sprig in two and lay it on top of the meat followed by one tablespoon of onion soup mix per pound of meat. Also add the fresh chopped parsley and 1 ½ cups of quality beef stock.
- Cover the pot and bake for 3 hours at 250˚ F.
- At three hours, slide the pot out and carefully add the potatoes around the edge of the meat and on top of the carrots, onions and stock. Move the rosemary from the top of the meat and poke it down into the juices. Slide the covered pot back into the oven and bake for an additional 3 hours at 250˚ F.
- When the six hours has ended, carefully remove the stockpot from the oven, take out the roast, and place it on a platter. Cover it with foil so it stays warm. Remove all of the vegetables and place them in a bowl and cover with foil. Strain the remaining stock using a fine mesh strainer or a gravy separator and pour it into a liquid measuring cup and set it aside.
- To make gravy, add the butter to the same pot and allow it to melt. Whisk in the flour and form a paste. Allow it to cook for 1 minute and then whisk in your reserved stock and drippings. Whisk just until it is thickened and turn off the heat.
- Shred the meat and serve with carrots, potatoes and gravy.


Comments & Reviews
Simply outstanding! I cooked my 4 lb roast for 6 hours and it fell apart effortlessly. It was so moist and delicious!! The only problem is, it wasn’t ready until 9:30 at night. I gladly ate a bowl full, but hubby was fast asleep by then. My concern is reheating it tomorrow. Any suggestions on how go do that?
Hi Tori!
So glad you enjoyed how tender the roast was! We usually re-heat it in the microwave with a cover and that seems to keep the moisture in. You can store leftover roast with some gravy on top too and that will also keep it from getting dry.
What adjustments should be made for a boneless roast ?
Hi Katrina!
This recipe works the same for a boneless venison roast. However, do not use the tenderloin or backstrap pieces. Those are best grilled or smoked. We have a recipe for those on Cleverly Simple!
My venison roasts always turned out dry in the Crock-Pot. I’m so glad I found this recipe! I’ve made it several times and the roast is always super tender and delicious!
So glad you love it, Ashley! 🙂
Meredith, I tried your “Venison Roast Recipe” in the oven. Although it has plenty of vegetables, it can not be good for you. Anything that’s this good can’t be. LOL. It was outstanding!!!!!!
Hello Meredith,
Thank you so much for this recipe. I made this recipe on Saturday. I cooked a 2 lbs bone-in roast at 250F for 2 hr 45 mins, pulled it out at that 2 hr and 45 mins to put in the potatoes and the roast was very tough at this point. I put it back in for 2 hr and 30 mins (keep hearing that if it tough I need more time in the oven). The result was a very tough roast. After cutting it apart (with a lot of effort) I noticed that there was a joint bone in there so I am not exactly sure what type of roast it was. It was a bit frozen in the middle so I think that may have been a factor. I am wondering if I should have cooked for less time as well. Have you any insight? Everything else was amazing. The veg and gravy were phenomenal.
Hello Bear!
I don’t believe it was the oven time that made it tough. Readers have slow cooked venison in the oven all day and it usually only gets more tender, not tougher. It could be the cut type of meat itself or the condition it was in after being in the freezer. Next time, I would recommend thawing the meat completely first and then basting it throughout cooking. Or try a different cut of meat all together. Sorry that it was tough for you!
Absolutely outstanding….. Moist and tender….thank you
Thanks Theresa! So glad you liked it 🙂
How many hours per pound is the cooking time? I have a small little less than 2 pound roast that I will be cooking. Thanks!
Hi Sheri!
I counted on about 2 hours per pound for this recipe. If you have a smaller roast, you can probably get away with 4 hours, but because the meat cooks low and slow, it won’t hurt the roast to go more than that. Hope that helps!
I have used this recipe 3 times now and after trying to make deer roast several ways, this is our favorite!!! Thank you so much! My mouth waters when I start opening up the recipe!
Can I use a Dutch oven pot to cook this?
You sure can! That’s what I use 🙂
Hi
Is there a formula for time in oven to braise per weight of the meat? Mine is on bone (shoulder cut)
Thank you
Hey Jackie!
Not really a formula per se…I usually sear the meat for a couple of minutes each side; just enough to get some browned crispy spots on the outer layer. Hope that helps!
Do you have to soak the roast in vinegar
Or lemon juice before hand to get the gameyness out?! I’m new to cooking venison and this was suggested for some cuts of meat
Hi Kim!
No, you do not need to soak the meat in vinegar or juice.