
How to Paint Cabinets
Finally, I’m able to share the step by step process I went through over the last few months to paint our kitchen cabinets. When I started this painting project in May, I had no idea that it would be the first week of July before I would have it finished. And while this was a long process, it was totally worth it. Our cabinets are white and everything I pictured them to be. You could most likely do this process in half the time, but coordinating my dad and brother to help with the finishing touches while juggling the schedule of my kids, made the process in slow motion towards the end.
Are you ready to learn how to paint cabinets? Sit back and take it all in! Warning: This is a long post with lots and lots of details. I learned so much during this process that I’m just bursting with information from what brushes are the best to what kind of paint to buy. Are you ready?

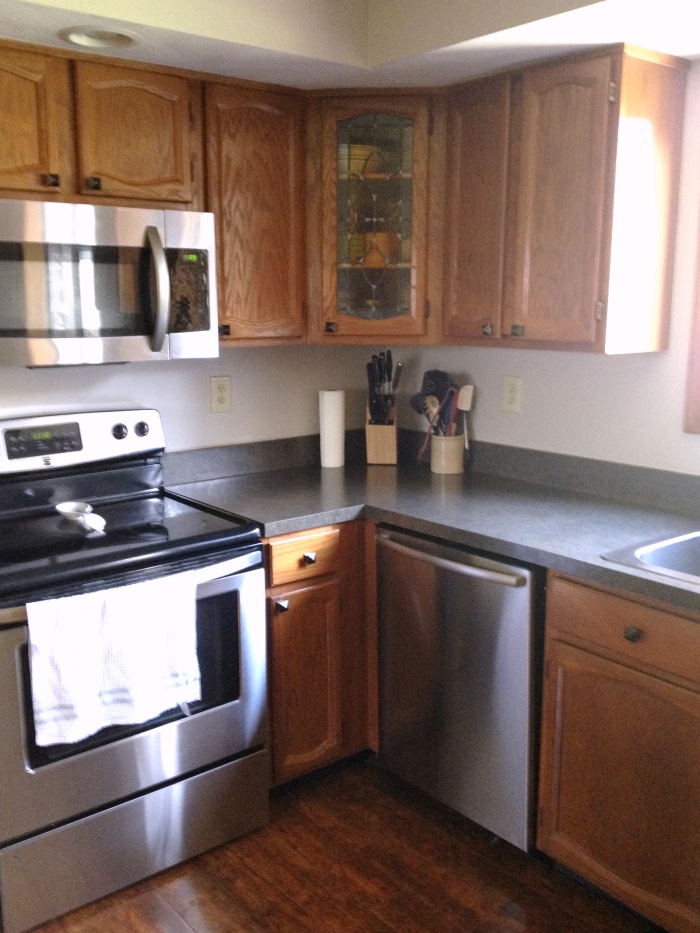
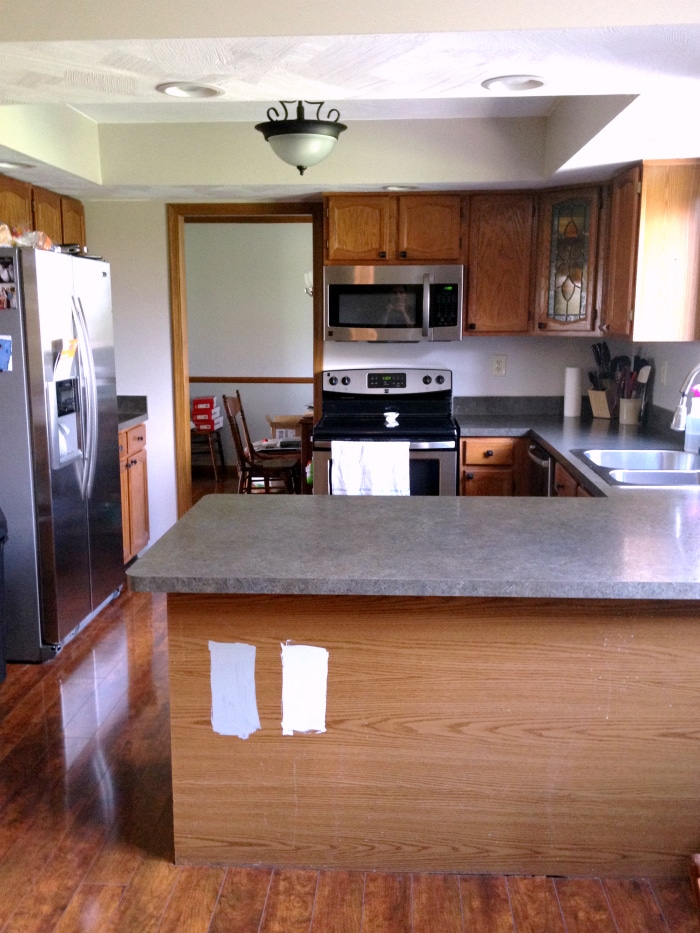
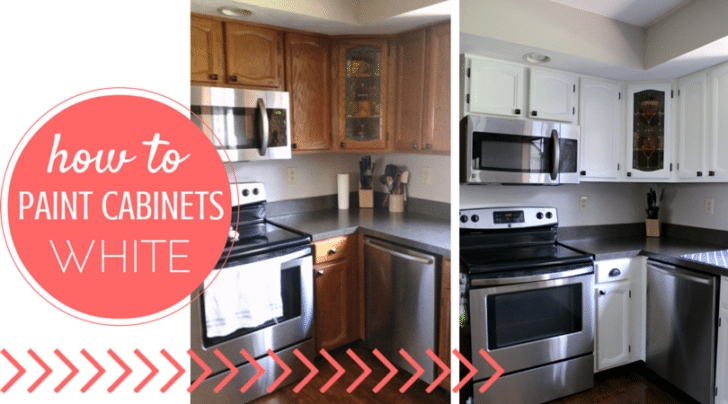
Here’s the before picture of our kitchen. As you can see, we had the lovely veneer on the island and on the sides of the cabinets. Why did they put veneer on solid oak cabinets? Those paint samples have been there for two years – from the first time I thought about tackling this process. And I didn’t even go with either of those colors! How’s that for irony? This was also about the time we had a contractor price out the cost of having our cabinets painted. They came back with $1500. And to be honest, we were going to do it until our bathroom fixes decided to bust our budget – and the kitchen stood un-painted.
To give you a little background, we bought our home in 2011. It was a foreclosure that was bought back from the bank – and we bought it directly from them. The cabinets don’t show too much wear in the picture above, but they were beat up. If you looked closely, you would see a thick tar like substance on many of the drawers. (The past owners smoked inside the home.) We had one cabinet that had a crack through half of the door and we were using hair ties to keep it together. It was time. Oh, was it time.
So where do you start? Here are the supplies I used throughout this painting process.
Cleaning Supplies:
Vinegar
Blue Dawn
Sponges with scrubbers
Prep Work Supplies:
Sandpaper (I used 60 to really rough them up, and then 220 to smooth them back down.)
Shop Vac
Tack Cloths
Mask
Plastic Tarp
Elmer’s Wood Putty
Putty Knife
Work Space Supplies:
Large boxes or saw horses
2×4 ‘s
Drop Cloth
Painting Supplies:
Benjamin Moore Advanced Paint (Worth every single penny! And I only used about 2/3 of a gallon on the entire project.)
Zinsser Paint (This was for priming. I liked the product but I would probably use Kilz if I did it again.)
2 inch brush (This one is the BEST! Seriously, worth the price. I bought a few different brushes during the process.)
Small trim roller (This is the best one. I tried quite a few and this one kept rolling and left a great, smooth finish.)
Small paint trays (This became my favorite by far. I could store my brush while I rolled with the little insert. You can find them for $0.99 at most stores.)
Frog Tape (Trust me on this, do not cheap out. I totally regretted using the cheap blue tape when it peeled off some of my ceiling paint.)
Painter’s Paper Rolls (Totally worth the price. The little paint rollers leave tiny dots of paint on your countertop or floor.)
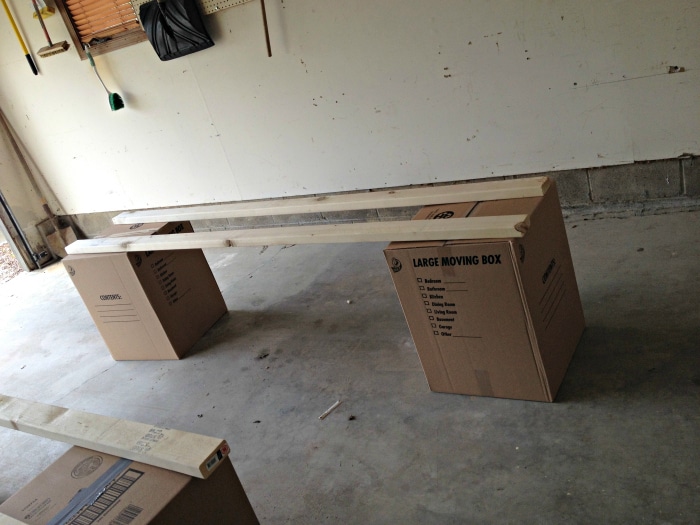
The first step was to create my work zone. I decided to use our garage. I wasn’t crazy about how dusty it could get in there, but I didn’t want to paint around the kids. Because of the number of doors, I decided to grab a couple of large moving boxes and a few 2x4s. They made a perfect (cheap) “table” for the doors so that I could work quickly.
Before you start removing the doors and the drawers you’ll want to make sure that you number them. I used painter’s tape on the inside of the cabinet and then labeled the door. So for example, I put a “#1” inside the cabinet and a “#1” on the door. You want to make sure your doors hang well when you’re finished so keeping track of where they go is critical. Once the doors were in the garage, I placed the painter’s tape number on the 2×4 below each door so that I didn’t have to worry about moving it while I painted. I could just flip the doors as I went.
With everything ready – I grabbed my dawn dish detergent and vinegar. I filled a bucket with water. I really didn’t keep track of how much of everything I added. Grabbing my scrub brush I went to town. These cabinets were d-i-r-t-y. I scrubbed and scrubbed and scrubbed.
Let me interject here and mention that Podcasts were my friend. I listened to “Stuff You Missed in History Class” almost the entire project. So, I guess you could say that my kitchen cabinets are not only updated – but so is my brain.
Back to scrubbing. (My least favorite part by the way.) After I got all the grime off, I let the cabinet doors and drawers dry for a few days. That might have been excessive, but it was humid as we were getting lots of rain and I wanted to make sure they were completely dry before sanding.
But even before sanding started, I had to add wood putty to the drawers. I was going from one hole to two holes on the drawer hardware. The Elmer’s putty worked great and I let that dry a full day before sanding.
Sanding was next. My next least favorite part. 🙂 I really sanded these babies. I read a lot of how much grit to use, but went a little rougher than most did. There was some tar (from the smoking past owners) that I just could not get off with just cleaning. The sanding really roughed up the surface and got them smooth. Finishing with the 220 sand grit was perfect. I had to be careful as I got so zealous, I think I over-sanded a few corners. But the reality is, you can’t tell once the paint gets slapped on.
I tried using a rotator sander at first. It was okay. You can’t get into the grooves like I really wanted, so even though I used it, I would go over it again by hand. So many steps – so little podcasts. Okay, not really. But that’s how it felt.
Once sanded, I used a Shop Vac to vacuum as much of the sand dust as possible. Then I went over every single inch with a tack cloth to make sure no dust remained. This step is important as you don’t want to have dust mix with your paint.
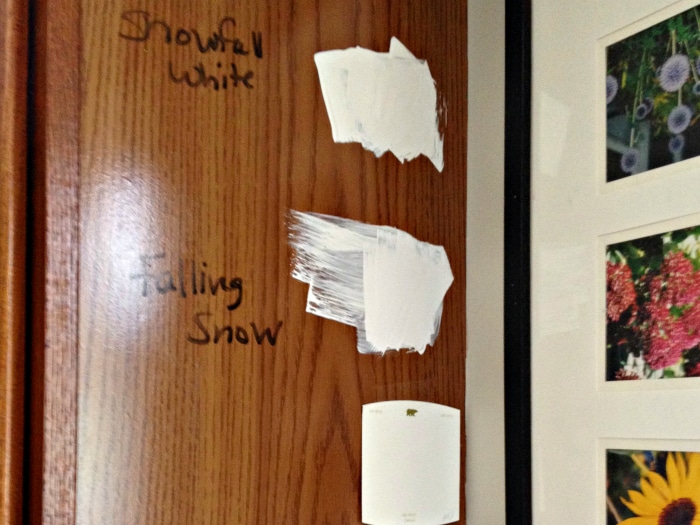
Let’s talk about paint. Before you get to the point of painting the cabinets, you have to pick a color. And not all whites are created the same. I bought about five samples based on some research on whites that people had used. I also grabbed a few other white color sample cards that caught my eye.
Since the veneer was going to be covered later on, I painted the samples on. They were painted onto the side of an upper cabinet and also a lower cabinet. This is SO important. The colors looked totally different depending on where they were. For example, at Home Depot, the paint lady told me that Cottage White by Behr was really popular. It looked great when I painted it on my lower cabinets. However, on the upper cabinets where it’s more shaded it looked yellow.
And after all the research I found that Behr’s Unwind was the best. Nobody had mentioned it online, it was one that I found all by myself. (I’m pretty proud of that.) It was the perfect white that held the white color even in the shadows. But it was a soft white that didn’t have too much yellow but also had a bit of green to it. And since I have green undertones in my countertops – it worked. It also looked great with my wall colors that are a light brown/gray/tan-ish. I just LOVE the color.
Now you may be wondering why I used a Behr color but purchased Benjamin Moore Paint. Well, my research said that Benjamin Moore Advance was the best paint for cabinets – and it did not disappoint . It’s like butta’. The $55 price tag was a bit hard to swallow, but the fact that I only used 2/3 of one gallon made it feel like a steal. I had the Benjamin Moore Advance matched to the Behr Unwind color. (And by the way, you have to find a paint dealer that sells Benjamin Moore. It’s not sold at most hardware stores.)
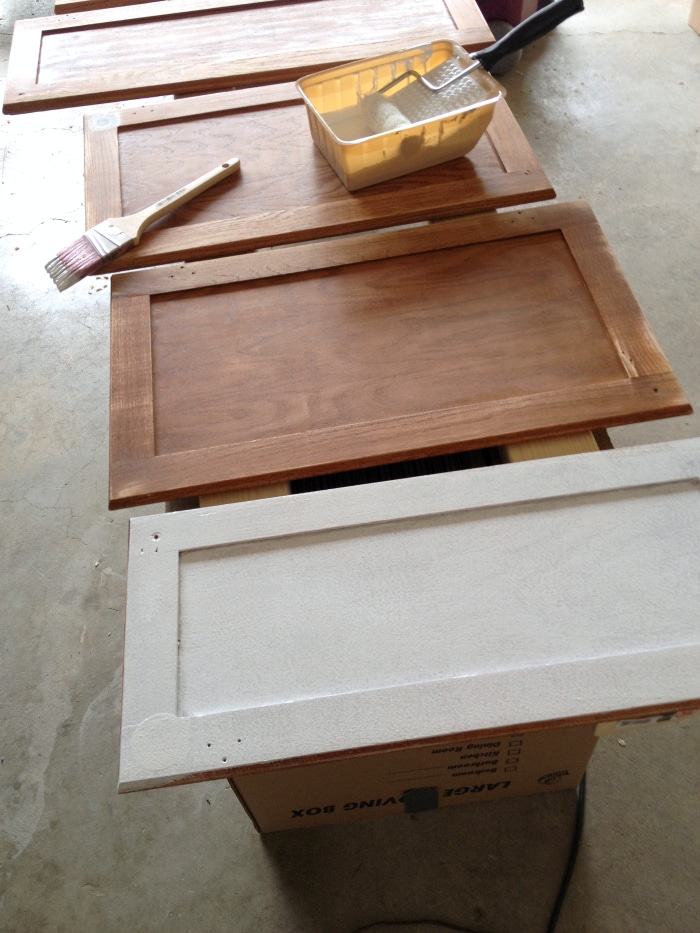
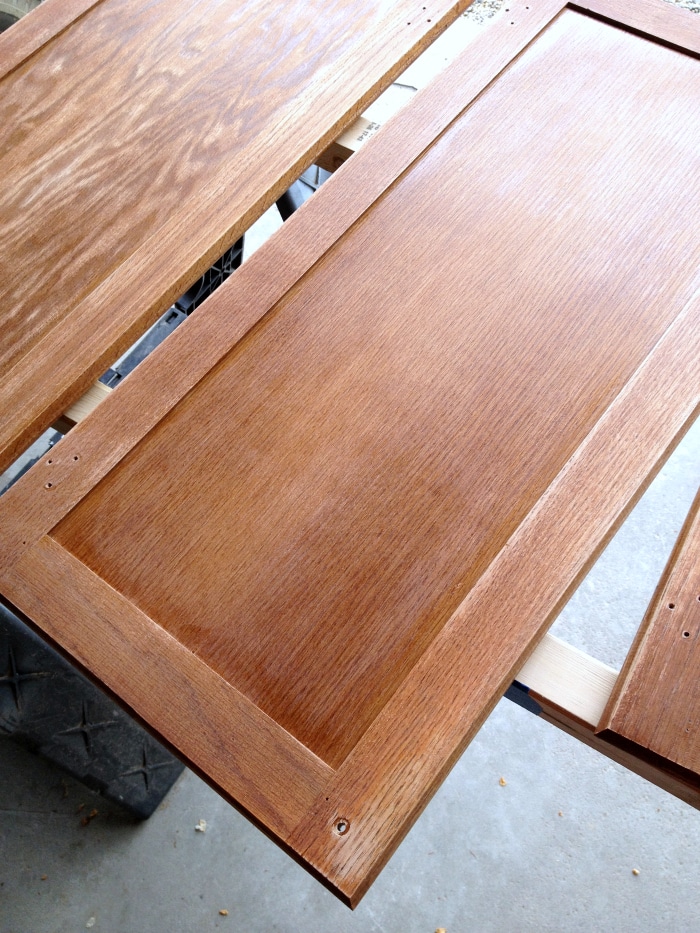
And then the first coat of Zinsser was on! I painted two coats of primer. After the first one, there were spots showing through, and so I did a second coat. I used the Wooster brush to get into all the cracks and then would roll to the best of my ability. (The picture above actually does not really show the roller or the tray I ended up using. I told you I went through many to find the perfect one for me.)
I painted one side of the cabinet and then let it dry for 24 hours. Benjamin Moore asks that you wait 16 hours with their Advance paint before a second coat. Because it takes so long to dry, you’ll find that it has the most smooth finish. And since that’s what I was looking for with my cabinets, it was the perfect paint. After waiting for the 24 hours, I would then flip the cabinet and do the other side. So, as you can guess. It took two full days to get one coat on each side. And this was only if we didn’t have evening activities with the kids.
One thing to note is that I did the sides of the cabinets when I did the front. I figured if it ended up dripping a bit, it would drip towards the back of the cabinet and not towards the front where it would be noticeable.
Brush, roll…. repeat.
In the end, I did two coats of Zinsser and two coats of Benjamin Moore. And then I let them dry for three weeks. That probably sounds extreme, but I wanted them to REALLY dry (obviously) before I hung them. The Benjamin Moore paint can says that they’re not fully cured for 30 days. And if I really did all this work, I did not want them dinged when I hung them in the kitchen.
Also, I had to wait for my dad and brother to be available to help them hang the cabinets with us. So, it all worked out. 🙂
Once the doors were done, I moved inside. Yes, I could have done both simultaneously but I only had so much time to work each night when the boys went to bed. So after the doors were done (It took about two weeks), I then moved inside to the kitchen.
This is where the project started to disrupt our home. Up until this time, we were living normally just without the drawers and the doors. It was actually quite easy to find the peanut butter. However, we did empty the cabinets when we started the actual kitchen and it all got real. I sanded and vacuumed and tack clothed.
And then I painted the four coats! It actually went faster than the doors which was nice. 🙂
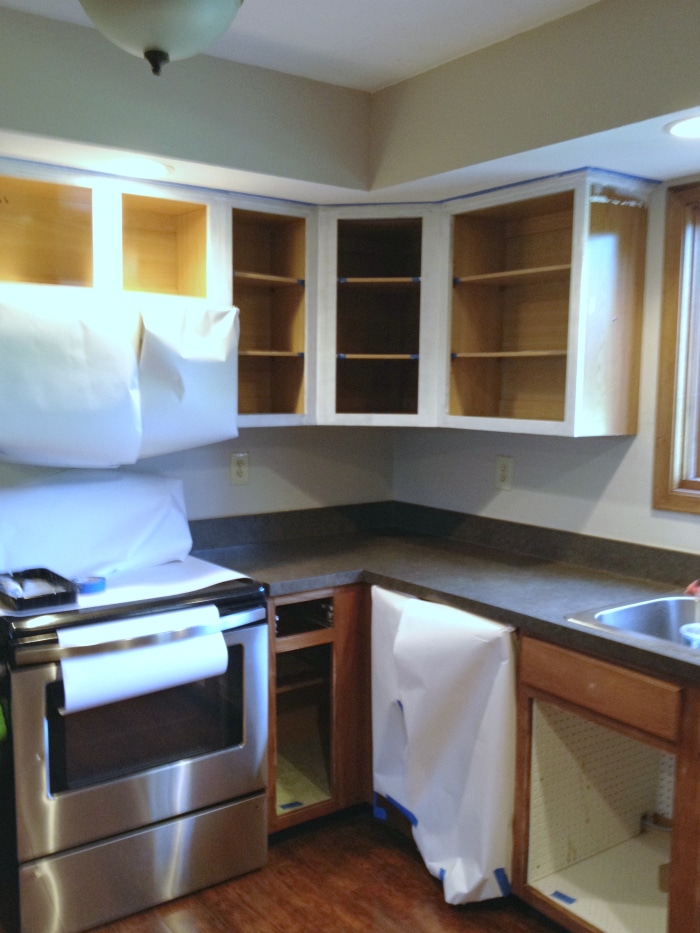
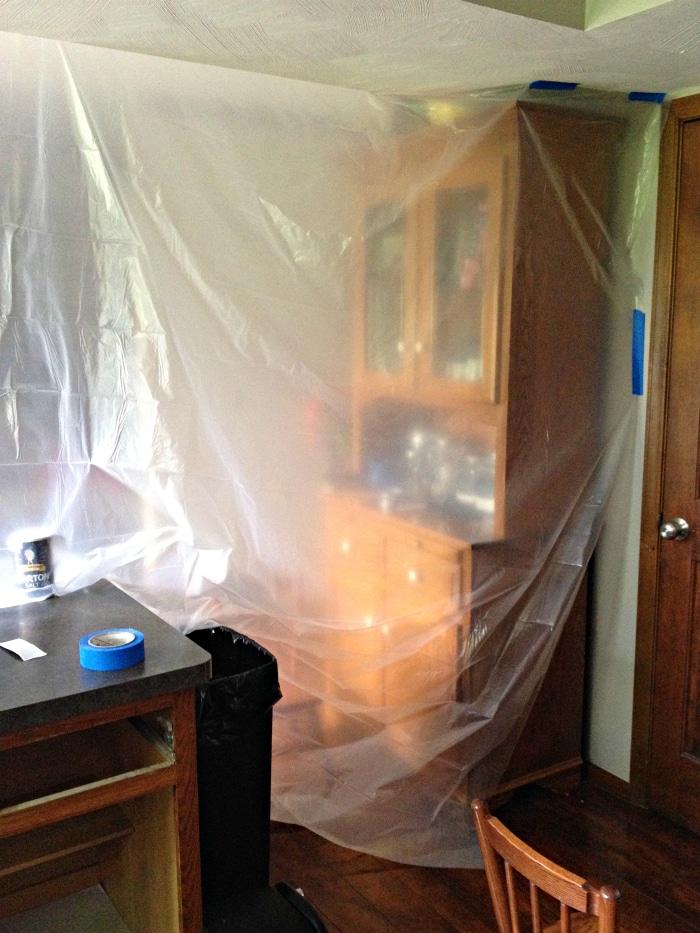
The inside was a bit easier to prep but it was harder to paint. Painting on a vertical surface means there are more drips. I had to be extra careful. I also made sure to really cover our appliances. At first I covered the dishwasher – but that lasted about 6 hours before I realized I was not going to hand wash all my dishes for a few weeks. So, I taped it really well and was extra careful around it.
Make sure to cover your countertops and your floors. I didn’t at first thinking I would just watch for drips. However, the roller leaves teeny tiny paint drops. Trust me, you do not want to have to scrape them off one by one. After realizing that, I used a portion of the paper roller and moved it with me. It wasn’t practical to cover the floor since painting the cabinets inside took a week. We couldn’t not walk around the kitchen forever.
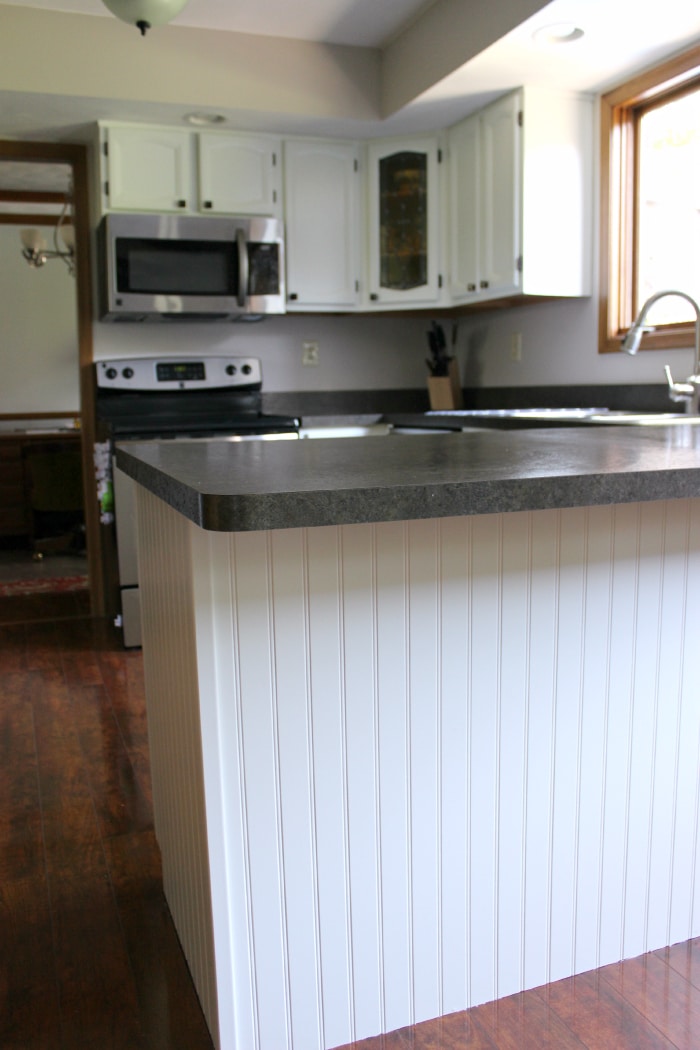
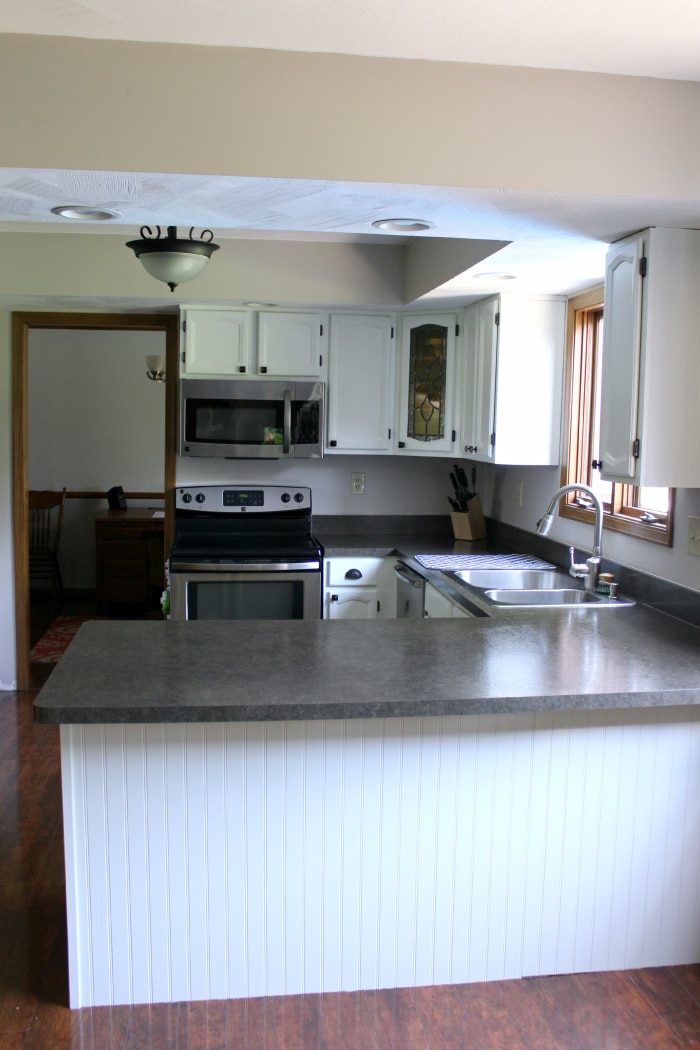
The final step was to install bead board on the sides. My dad was the master of this. I was so proud of him and his craftsmanship and it was fun to work alongside him on a project. It turned out great and covered the veneer (and my paint samples) perfectly.
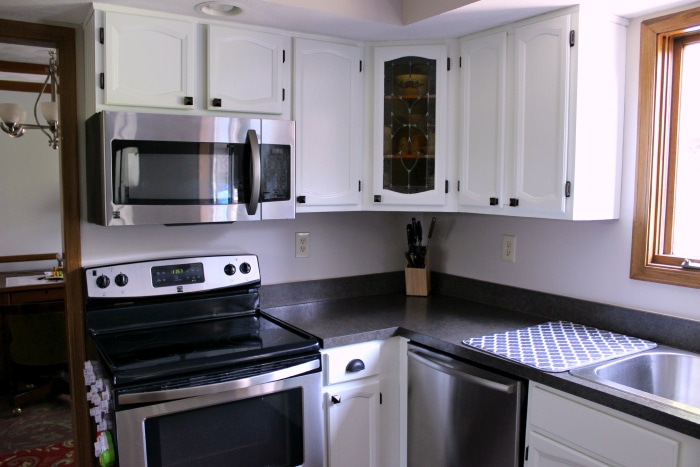
And weeks later, after lots of drying… here’s the final reveal! I absolutely LOVE it. It turned out even better than I ever imagined.
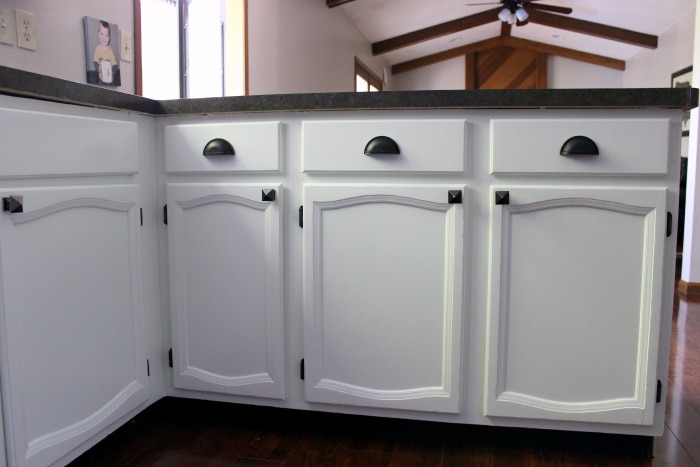
We purchased new hinges and drawer pulls and used our old knobs. I could have spray painted my old ones, but the hinges were pretty gross – for lack of better words. Spending the extra money was totally worth it since I had spent so much time on the painting.
Of course, we ran into a few bumps in the road. After inviting my dad and brother over, and fixing them dinner, we found that the new hinges that were “identical” to our older ones, were not really identical, after all. They had this little lip that would wrap around the cabinet that was just a hair smaller. Apparently, my 1986 hinges needed just a light change. My dad had to literally grind down the back of the cabinet where each hinge would fit. Of course, if I had picked my hinges when I started, I could have puttied the holes for new ones – but since I discovered this very important detail AFTER painting – well, live and learn. And be thankful for very smart and giving family members.
After.
What a difference some paint makes, right? In the end we spent a little over $200. While this project took weeks, we got the look we wanted for far less than hiring someone to do it for us. A little elbow grease and a lot of determination got us some sweat equity for our home.
So what questions do you have? Are you thinking about taking on some kind of project like this?
Ready for another project? How about making some of these Cheap Simple DIY Lights?


Comments & Reviews
Great work! We have the honey color as well and just purchased the BM advanced satin. You mentioned the brand of primer but can you tell me the exact primer used? Thanks so much.
Hi Ryan. I used the Zinsser 1-2-3 primer for all surfaces. It says you don’t need to sand, but I would suggest sanding especially if you’re doing the kitchen cabinets. I’ve used Kilz as well with great results. Good luck with your project!
Excellent information! Your cabinets are beautiful. I’ve been reading about paint that is specifically made for cabinets but I feel like your method/supplies/products have solid results. How has the paint held up over the years? Thanks!
Hi Julia, we now longer live in the home where we painted our cabinets. However, they did hold up very well the remaining time we did live in the home. And that’s with two very active boys! I used the paint again on pantry cabinets in our laundry room in our new home and it’s holding up very well. They look great too!
Thank you!
You worked so hard on that! Goodness! It looks AMAZING! I’m so excited to eventually buy a house and do house projects with my hubby. Bonding time, right? 😉
Great Job love ur posts, I have always wanted white cabinets. I am almost 70. I wish I knew when I was younger. Keep it coming.
My kitchen is from the 70’s and all the cupboards are veneer, so this wouldn’t work for that, right? See you covered your veneer with something your dad made….just wanted to be sure, before I go and take on a project like this…..
Hi Bianca, yes I would not paint veneer. I have used gel stain on veneer and it is holding up really nicely. Of course, you can’t go white – but it would update it. https://www.cleverlysimple.com/how-to-gel-stain-cabinets/
You can paint veneer, use a chalk paint. It will stick to the veneer. I painted my bathroom cabinet, and it has held up for well over a year now.
Did you change the molding color of your wood? Your kitchen looks very similar to mine and we are planning this exact project for spring. Are you able to take a picture of the cabinets and the window to see what the color contrast looks like? Beautiful job!
Hi Cindy, my woodwork was like a darker honey brown. The house was built in 1986. I actually just completed painting my trim all white. I love the wood color but since we bought a foreclosure, the wood was so beat up that painting was less expensive than replacing.
What type of finish did you use for the paint? Satin?
Hi Jodie, yes. We used Benjamin Moore Advanced in satin. It is worth every single penny especially since I used less than one gallon on the entire project! It has held up really, really well.
Lynette – it looks AWESOME! Great job! We are doing our cabinets next month and are using a Rustoleum Kit – I am nervous but also VERY excited to have a fresh new kitchen!
I did mine in early spring too! Mine were a little lighter in color then yours were. We have 22 cabinets in total and I finished them in 4 days. I’ve done all the washing, sanding and painting(3coats of it) by myself with 3 boys ages 2, 4 and 6. My husband just put the doors back for me. I just can’t imagine my kitchen looking like a construction site for that many months. I did plan ahead our meals and froze a lot of casseroles.
Love your new kitchen!! I love white cabinets!!
Awesome job!! They look fantastic. And very informative post. 🙂