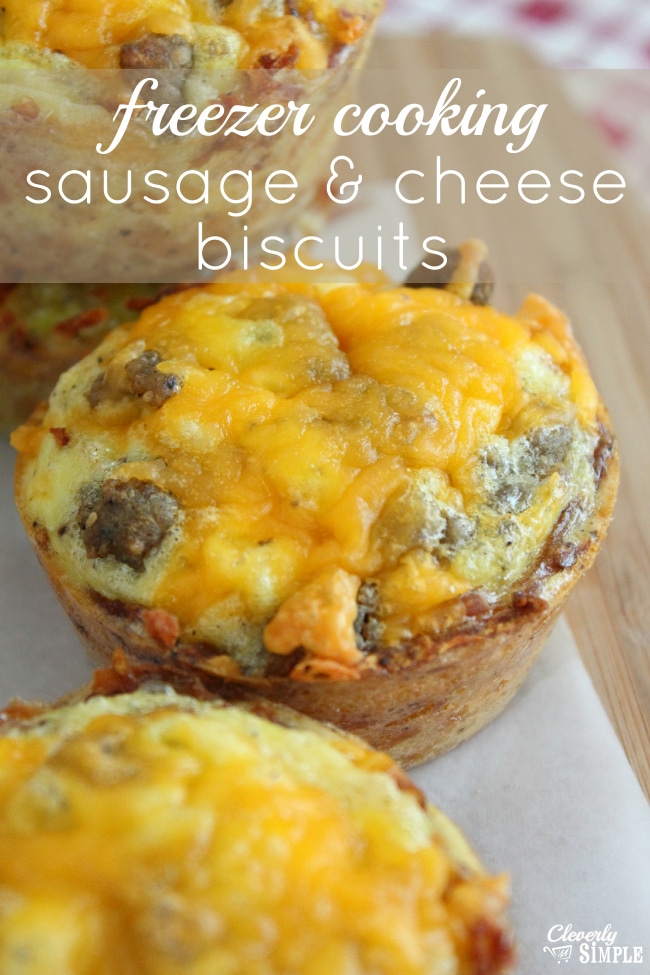
I have another freezer cooking breakfast idea for you today! Unlike the breakfast burrito recipe, these Sausage and Cheese Biscuits are smaller which also makes them perfect for an after school snack! I love batch cooking something like this so that I can have a hearty breakfast within a few minutes. Especially with school starting in a few weeks, I’ve been looking for ways to make our mornings simple(r).
Sausage and Cheese Biscuits
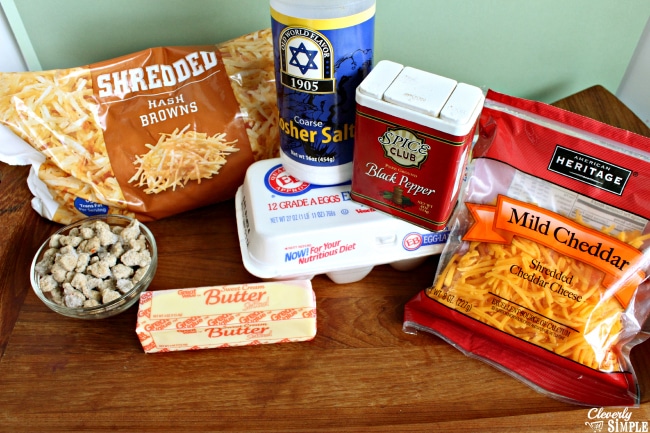
To make these sausage and cheese biscuits you will need:
4 Cups Shredded Hash Browns, thawed
4 Tbsp. Butter, melted
1 teas. Salt
1 teas. Pepper
8 Eggs
1 ½ Cups Shredded Cheddar Cheese
1 Cup Sausage, cooked and crumbled
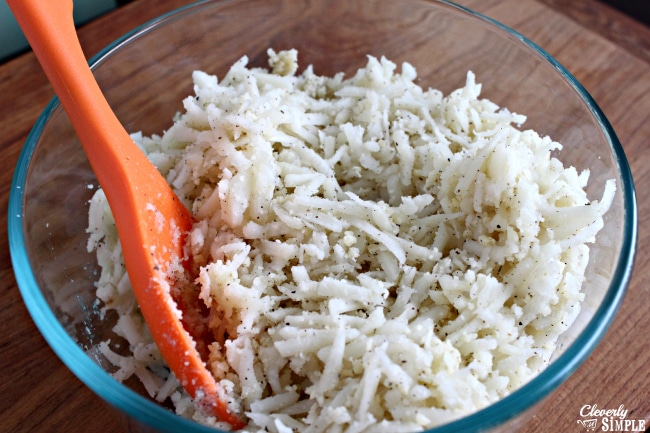
Preheat your oven to 400 degrees fahrenheit. In a large bowl combine the shredded hashbrowns, butter, salt and pepper. Spray your muffin tin VERY well with cooking spray and fill the cups about 3/4 of the way full with the hashbrowns. I sued my fingers to mold them to the muffin cups. It’s okay if they stick out a bit. Try to make the sides all the same thickness so they will cook evenly. You’ll also want to make sure there’s plenty of hashbrowns at the bottom of the muffin cups.
Bake 20-25 minutes, or until they are starting to brown. Let cool slightly.
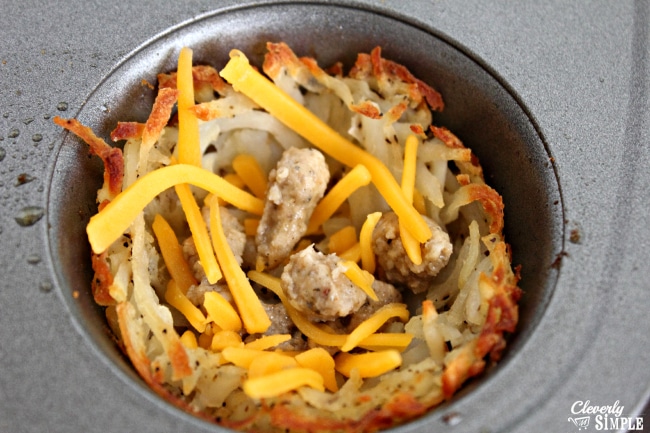
Reduce oven to 350 degrees fahrenheit. Take half of the shredded cheese and spring it in the bottom of the hashbrown cups. Repeat with half of the sausage crumble. Whisk the eggs together and fill the cups until almost full. Top with the second half of the cheese and sausage.
Take half of the Shredded Cheese and sprinkle in the bottom of the cups. Repeat with half of the Sausage Crumble.
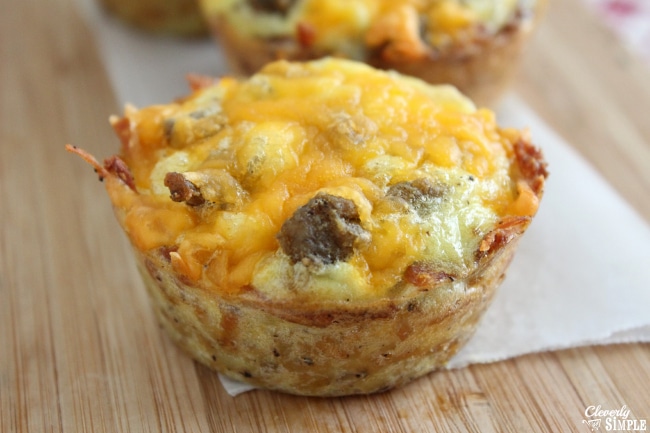
Bake until the eggs are set which takes about 20 – 25 minutes. These are soooo good right out of the oven. Otherwise, I let them cool a bit and place them on a cookie sheet in the freezer. After two hours, place them individually into ziploc gallon bags. They’re ready to heat up in the microwave when you’re ready to eat!
Enjoy!
If you plan to do a lot of freezer cooking, make sure to grab these pans! You won’t find a better deal!

Want to save this recipe?
Enter your email & I'll send it to your inbox. Plus, get great new recipes from me every week!
Sausage and Cheese Biscuits
Ingredients
- 4 cups shredded hashbrowns thawed
- 4 Tablespoon butter melted
- 1 teaspoon salt
- 1 teaspoon pepper
- 8 large eggs
- 1 ½ cups sharp cheddar cheese shredded
- 1 cup sausage cooked and crumbled
Instructions
- Preheat oven to 400˚F.
- In a large bowl combine the hash browns, butter, salt, and pepper.
- Spray a muffin tin with cooking spray. Fill the cups about ¾ of the way full with the hash browns.
- Press with your fingers to mold the Hash browns to the cups all the way to the top. Don’t worry if they stick out a little. Try to make the sides the same thickness all the way around for even cooking. Make sure there are hash browns on the bottom of the cup.
- Bake 20-25 minutes, or until they are starting to brown. Let cool slightly.
- Reduce oven to 350˚F.
- Take half of the Shredded Cheese and sprinkle in the bottom of the cups. Repeat with half of the Sausage crumble.
- Whisk the eggs together and fill the cups until almost full. Top with the second half of cheese and sausage.
- Bake until eggs are set, 20-25 minutes.
Notes
Nutrition
Are you going to make these Sausage and Cheese Biscuits?


Comments & Reviews
You sued your finger? You are one litigious lady!
Ok, the recipe looked good plus the calories were really good for me being I’m always on a diet. I had to borrow extra pans…who has 36 muffin tins anyway? Come to find out, the recipe only made 12, not great on the calories anymore and I was more than annoyed. From the photo, these were not mini muffins nor was it said anywhere that regular muffin tins were not used. This puts a further nail in the coffin of Pinterest recipes!
I apologize that there was confusion with the recipe. I’ll take a look and update it to make it more clear. Thanks for the feedback.
My hubby thinks they would be mushy with the hash brown. What do you think?
how long will the last in the freezer
Hi Sarah, I usually keep things in the freezer for no more than three months just to keep them tasting fresh. Of course, if you use a vacuum sealer you can keep things in the freezer much longer.
I made these and love them for breakfast. The only thing that didn’t make sense to me was how you got 36 from this recipe if it’s only 8 eggs. I came up with 18 cups total and they were filled decently. Overall these turn out well if you spray the cups with plenty of non-stick to get the hashbrowns out.
Hi Sarah, I used a mini muffin pan. If you use a large muffin pan you would get less.
How long will they last in the freezer?
Love the look of these but we don’t seem to have your type of Hash Brown here in Australia. Would coarsely grated raw potato work instead. Thanks!
Shredded or grated potato would work buy soak in water first to remove the starch then dry in paper towels. Also the cooking time would be a bit less so watch carefully.
Thanks Sheryl!
How many does this yeild?
I’m so excited about these! I’m going to try them next weekend. Thanks for posting! I just discovered you and subscribed after reading only two posts! That’s a new record:)