One of the key things when renovating an old home is being ready for solutions to problems – and making sure that they are creative solutions that look good. After sharing our farmhouse kitchen renovation, I knew I wanted to highlight one of our key solutions in the kitchen.
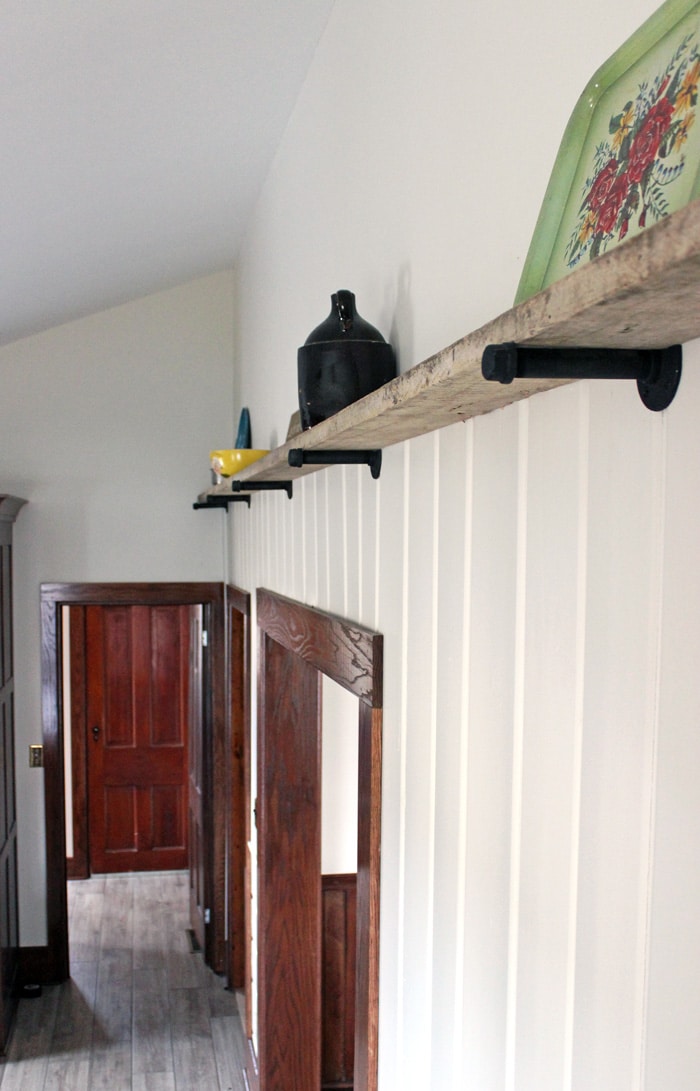
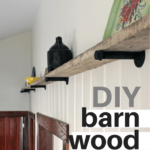
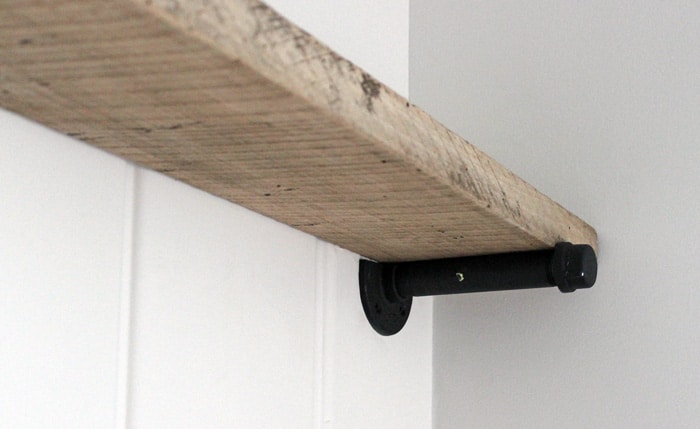
Our barn wood shelf has become one of the highlights of our space! And would you believe that I created the brackets that it hangs on!? Sometimes finding the perfect piece is all about being creative.

After deciding to keep my grandma’s paneling on one wall, and then vaulting the ceiling we had a 3 inch gap from the thickness of the paneling. It didn’t look good and we had to find a solution. Vaulting the ceiling was completely worth it but I wanted something that looked good between the dry wall and the paneling. The solution we came up with was building a long shelf that covered the entire length of the wall. But then the questions arose as to what kind of shelf we wanted, how thick we wanted it to be and what kind of brackets we needed. Oh, the questions during a renovation never, ever end.
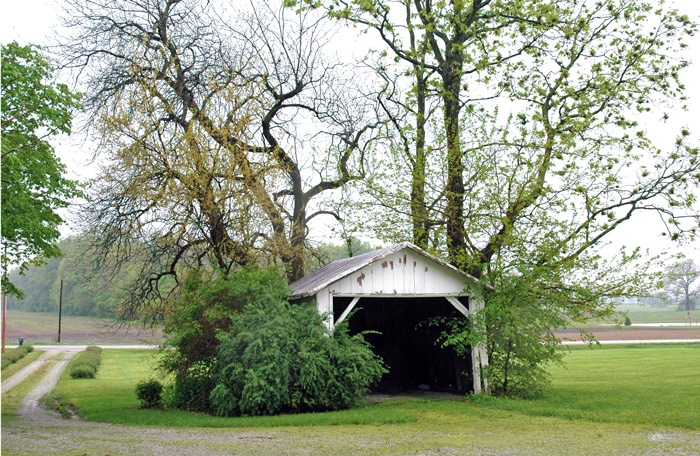
We didn’t have to look far though. Before we tore down the small garage, we had discovered two very large pieces of wood. How long they had been there, I will never know. They were tied up with wire on the side of the garage – and had probably been there for 50 or more years. It seemed odd that they were in there and I had saved them to use in some way. Little did I think they would end up in my kitchen.
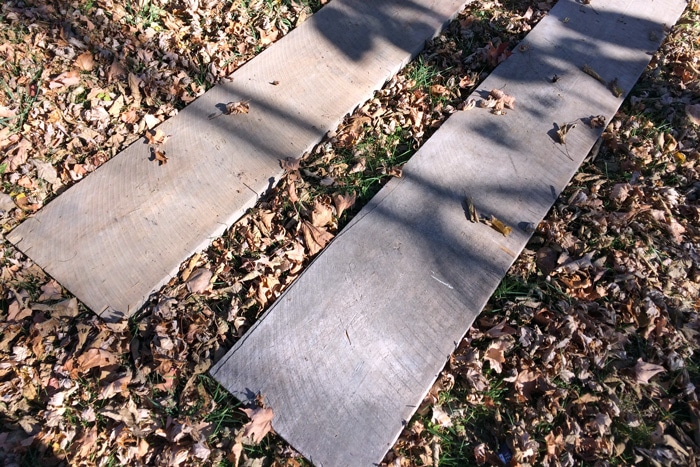
The two large pieces of barn wood were approximately 10 feet long and 21 inches wide. They were also about 2 inches thick. This ended up being exactly what we needed. Although they didn’t necessarily come out of our 1800’s barn, the garage has been there for at least 100 years, so they were old. In fact, they probably were older than the garage.
If you’re looking to tackle a barn wood shelf, you’ll want to make sure that you find almost identical pieces of barn wood. They need to at least be the same thickness. Since our shelf was over 25 feet long, this was a special kind of challenge for us. However, in our laundry room I plan to build a few shelves that are only about 2 feet long. That will be much easier as they can be cut from the same board.
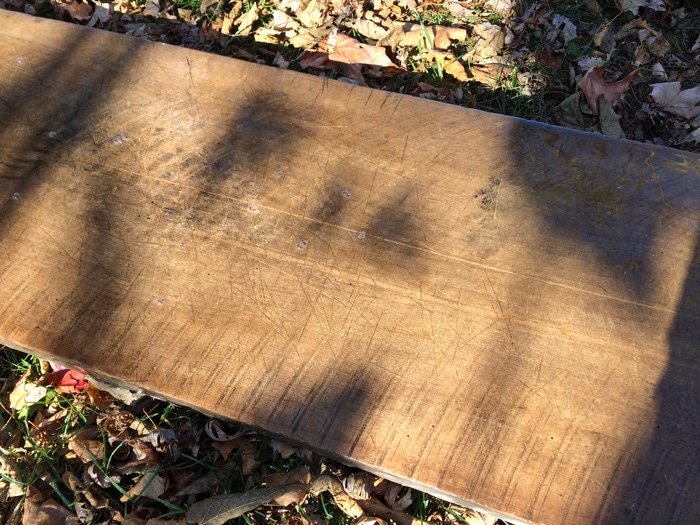
The wood had decades of dirt on it. After doing a lot of research I decided to just use blue Dawn and a good scrub brush. I was afraid that power washing them would be too powerful and take off some of the detail. These boards had beautiful saw marks as well as a worn look to them. It took a a lot of elbow grease and many uses of our garden hose, but they cleaned up quite well. I did this all outside, of course. After the many scrubbings, I let them dry in the sun.
What to use to clean barn wood:
Scrub brush with handle
Blue Dawn
The next question was what would we use to hold the barn wood in place. There were quite a few options and I contemplated many of them. Here’s a few of the options I looked at.

- Reclaimed Salvaged Metal Steel Shelf Wall Brackets
- Cast Iron Shelf Brackets
- Polyurethane Corbel
- Cast Iron Shelf Brackets
- Upper Deck 2 Brackets Shelf
- Victorian Shelf Bracket
After considering all of the above, nothing really stuck out to me as the solution I really wanted. The victorian brackets, while pretty and antique looking, were too ornate. Then the simple brackets looked too plain. My other problem is that I knew the wall was going to be light ivory so I didn’t want a bracket that would stand out too much since it’s above our heads in the kitchen. Most of the brackets had a triangle look to them or were shaped like a “v”. I wanted the barn wood to be the star and so desired something that would be simply vertical, but strong. So, I did what anyone would do in this circumstance and I turned to Pinterest. I found a bracket that I could make that had an industrial look and also would cost less compared to many of the other options I had found.

I’m not really sure what you would call it exactly, but it fits the space just right and I absolutely love it!
How to make your own barn wood shelf brackets
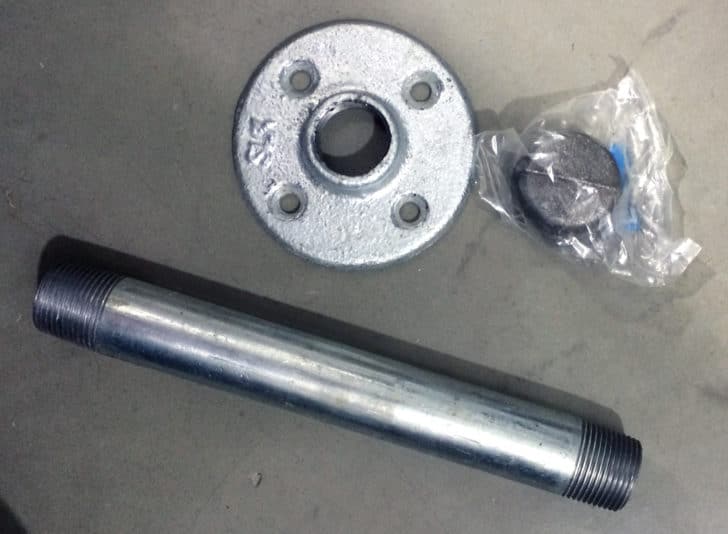
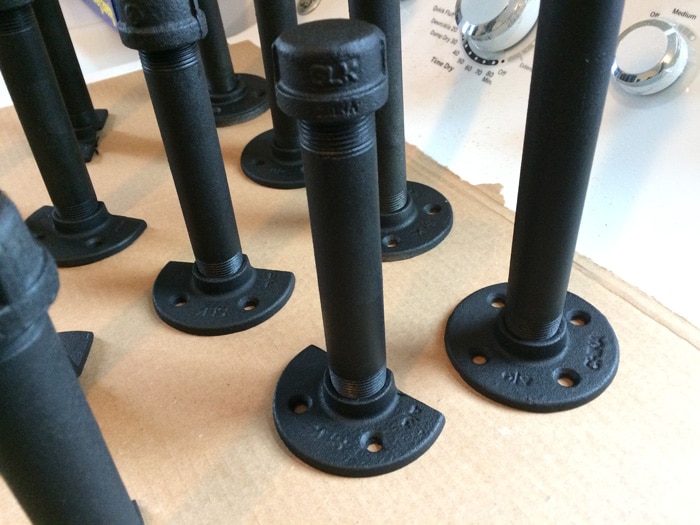
You will need some plumbing supplies to tackle this project. I did get some weird looks in our local hardware store. I guess not many girls are buying 9 of everything in the aisle I was in. In fact one gentleman asked me what I was up to. I mean, did I not look like I belonged there?
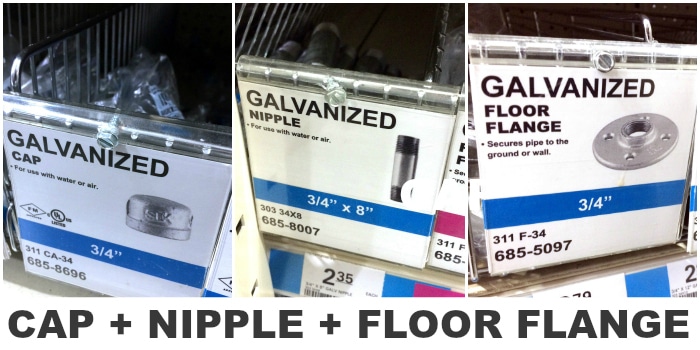
You will need one galvanized cap, one galvanized nipple and one galvanized floor flange for each bracket you want to create. The caps, nipples and floor flanges come in a variety of widths and the nipples come in a variety of widths and lengths. I chose to go with the 3/4 width as it wasn’t as wide as the 1 inch which felt too bulky, but not as skinny as the 1/2 inch. It’s really a matter of preference just make sure all 3 pieces are the same width.
I also went with the 8 inch long nipples. Can we just take a moment here to ask why the nipples are called nipples when it comes to this galvanized supply? I would think that looking at what these are – the cap would be the nipple. Instead you can have your choice of 6 inch nipples, 8 inch nipples or even 10 inch nipples. And how realistic is that?
… I went with the 8 inch nipples because I wanted to cut our boards to 8 inches wide. Although they were 21 inches wide originally, there were some less than straight lines to them and a bit of cracking at a few of the ends as well. Eight inches ended up being perfect, but I think 10 inches would be equally awesome depending on how far out you want your shelf to be.
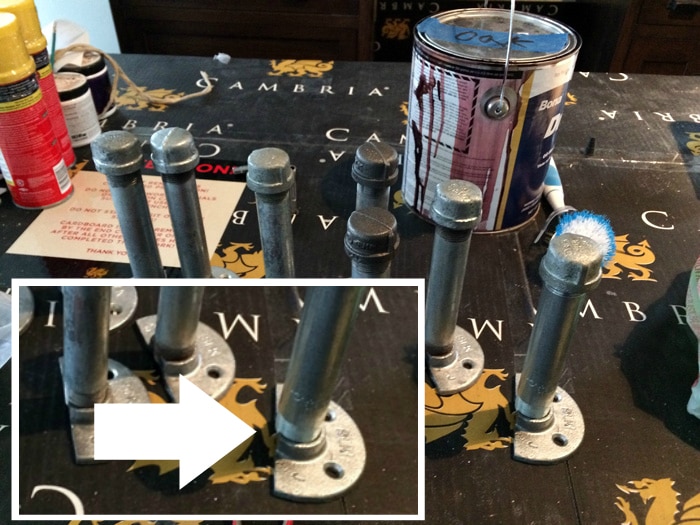
The first step is to assemble your brackets when you get home. Some are a little more picky as to how far in they want to twist. I just made sure that each was approximately the same once I had them all screwed in.
Now because of the uniqueness of our shelf needing to cover the paneling to drywall gap, we had our sub-contractor saw off half of the floor flange. This is not necessary if you’re building a regular shelf. In fact I had 10 inch brackets I created for our laundry room (you can see it here) that I didn’t have them saw off the the tops. You’ll see why I had to do that later. Because of the uniqueness of sawing them off, I had them saw off the “made in China” part. I can pretend they’re at least antique and made in America. 🙂
You will need two different kinds of spray paint to make the brackets look old.
Textured Black Spray Paint
Flat Black Spray Paint

First, spray paint the brackets with texture. I really like that rough look.
Once the texture has dried, spray paint them with flat black. Don’t they look awesome! That’s about all there is to making these brackets. So easy! They cost me about $9 per bracket with the size I picked.
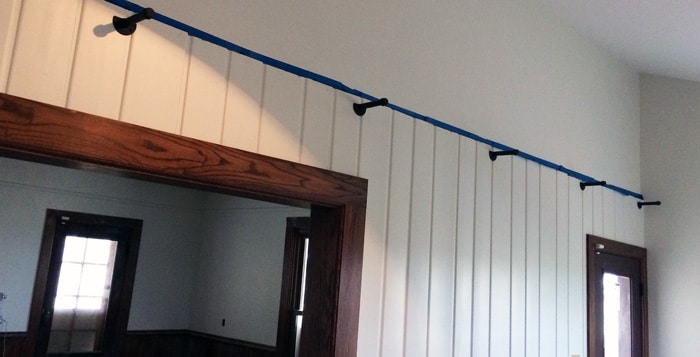
Measuring them equal distance, we installed the brackets. We made sure that they were even by using a laser level. The wall, as in most old houses, was not level, so the laser was our good friend.
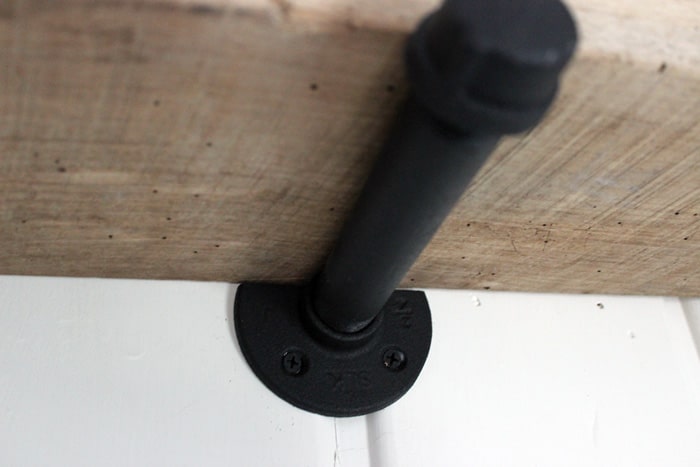
To install, you just screw them into the wall. You can see the way we sawed off the floor flange worked in this instance. We didn’t want a gap as you looked up to the shelf which is why we did it this way. If your shelf isn’t 9 feet high, it wouldn’t be a big deal, but I knew a gap would bother me.
Our shelves went wall to wall, so we had them cut exactly to the length we needed them.
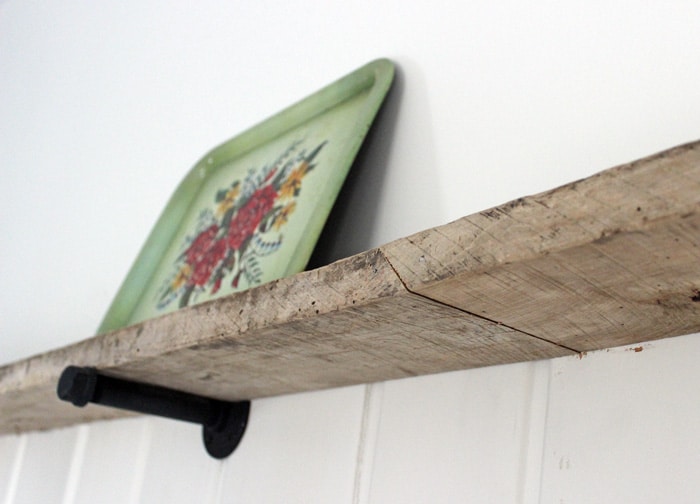
And where two pieces of wood met, an angle was made. They were then attached to each other. One thing to keep in mind is that old barn wood like we had is really hard to keep straight. Ours had a bit of a wave to it, but when it was put up on the wall, it all worked out. Just look at that detail in the wood!
Before the shelf was installed, I had thought about staining the barn wood since our kitchen cabinets are dark. Life got too busy with the renovation process and before I knew it, I walked in one day and the shelves were going up. I think it worked out though. I think it looks beautiful exactly like it is now!
I’ve started to add things to the shelf. I have some antique pieces that I don’t want to use, but do want to look upon. As of right now, they’re just placed up there randomly. As I collect things I’ll add to it.
Overall, I think this ended up being a smart solution to our problem in the kitchen! I loved using the barn wood from our farm and then create something that fit the space so well!
What do you think?
To find out more about our farmhouse renovation visit here.


Comments & Reviews
Thanks for the great ideas & guidance! We just built a log cabin & did upper shelves in our kitchen. Did all pipe brackets with 2×12″ shelves. Love the results! Would love to post some photos for you.
I would love to see the pictures! You can email them to me at cleverlysimple @ gmail.com or you can tag me @cleverlysimple on instagram. Can’t wait to see your shelves!
The instructions were very good and helpful thanks for explaining the different parts as I am wanting to do this in a room in our home.
You’re welcome! Let me know how your finished barn wood shelf looks!